Components
Component Types
- Web Controllers
- Rest Controller
- Controller Advise
- Manager
- Repository
- Listener
- Rest Client
- Config
- Starter
- Support
- Other
Creating Components
Creating Web Controllers
Once we have generate and customize the Views, we can move forward to generate the components needed to drive the application. The most important component is a Web Controller to control the rendering of the Superhero pages and data. This is the only component that we will strictly need run and test the app from within the App Studio with the built-in emulator. Other components if needed, are implicitly created by the emulator.
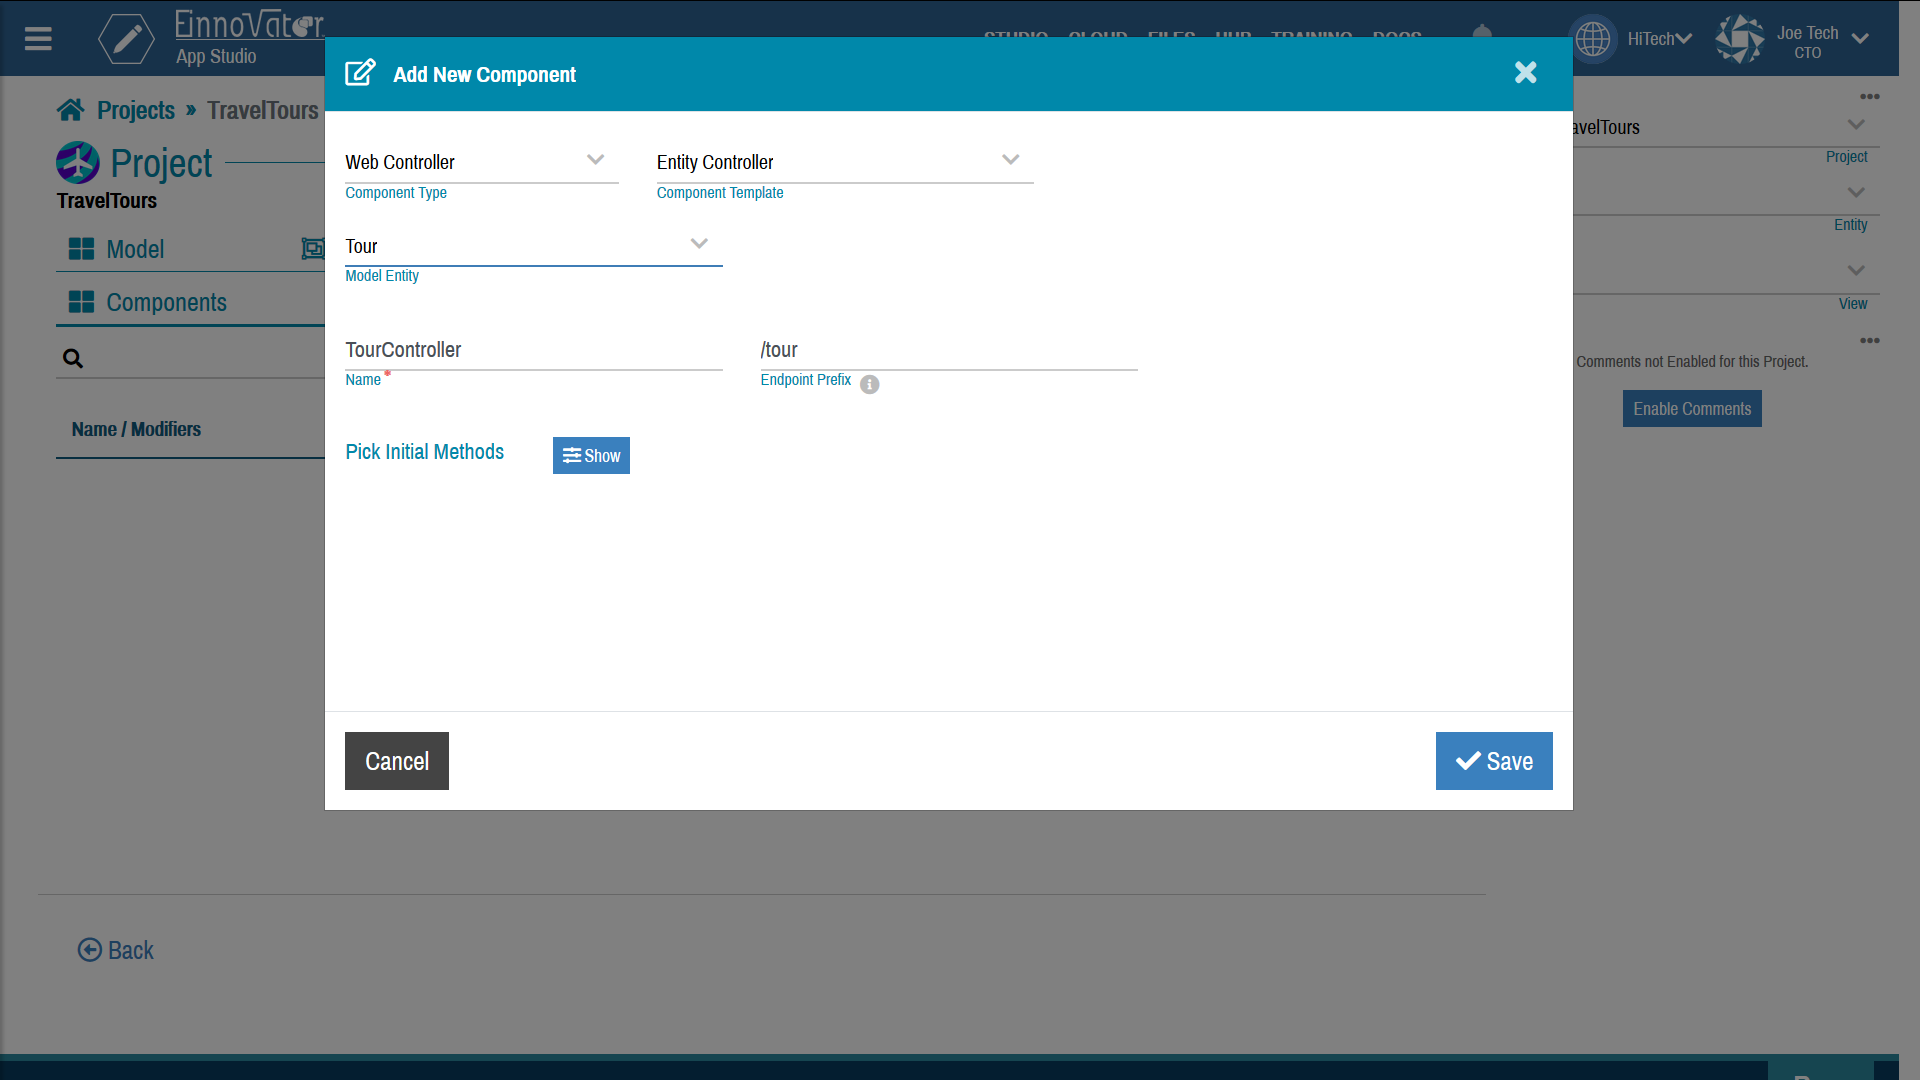
On project tab Components, click Add Component. Select component type Web Controller, and component template Entity CRUD. Select entity Superhero. Leave the other settings with default values. This will create a component named SuperheroController.
Confirm that the SuperheroController is create with success, with several methods each with a body of instructions. This methods implements the basic CRUD workflow to list, create, and edit instances of Superhero. The generated methods and instructions body are usually enough to get started with the project, and rendering the generated view. However, it is always possible to extend and modify the existing methods and add new methods to the component. App Studio offers an intuitive mixed visual-imperative programming model, that should be easily understandable by starting developer but powerful enough to support complex use cases and the sophistication of experienced developer.
Most methods in this generated component have an associate endpoint mapping, with an HTTP method and an associate URL path. The component SuperheroController defines also a based endpoint path prefix /superhero. So the actual endpoints concat this prefix with the path specified in each endpoint method. The generated endpoints are summarized and explained below:
GET /supeheros list()‐ Render the lists of SupeherosGET /supeheros/{id} show()‐ Renders the details page of a particular Supehero uniquely identified by theidin the path.GET /supeheros/create create()‐ Renders the Supehero creation form pagePOST /supeheros createPost()‐ Processes a submitted editor data (form in a web app) and create a new instance of Superhero. Redirect to the details page if the creation is successful.GET /supeheros/{id}/edit edit()‐ Edits the details of an existing SuperheroPUT /supeheros/{id}/edit editPut()‐ Processes a submitted editor data (form in a web app) and updates the instance of Superhero. Redirect to the details page if the creation is successful.DELETE /supeheros/{id} delete()‐ Deletes the instance of Superhero with specifiedid. Redirect to the listing page after deletion.
An additional method of category ExceptionHandler is also generated. This is method captures and processes any error Exception sent by other methods.
Looking at the body of the generated method, you should notice that the ones that render a view complete the processing with instruction RENDER. This is the instruction used to select the view to render. The parameter of the RENDER is the name of the view. Confirm that those view name match and are bound to the View pages create earlier. If this is not the case (e.g. if you changed the default view names), select the view as appropriate.
Similarly, the methods that perform a redirect do this with instruction REDIRECT. The parameter of this instruction specifies which other HTTP endpoint should be rendered next. Confirm that the endpoint path match and are bound to other endpoints in this component. If you change the path of some the method endpoints, you should update the path as well in the REDIRECT instructions that should reference that endpoint.
Exporting Modal Variables
Next step is to invoke the method SuperheroRepository.countGroupBySquad() from the method SuperheroController.list(). Navigate to the dashboard of the SuperheroController component, and notice the instructions toolbar on the top. Drag the instruction EXPORT and drop in the method list() before the RENDER instruction. The EXPORT instruction is used to make data available during a view rendering. It takes two parameters, one for the name to give to the exported variable and another for the expression to assign to the variable. Enter squadCounts as variable name and superheroRepository.countGroupBySquad. This is shown in the image below.
Creating Rest Controllers
Setting Status Codes
Creating Repository Components
The Views and controller code generated automatically provides a good starting point to build the Superhero application. More often than not, we want to go further than the vanilla solution produced mostly automatically by the App Studio templates. To demonstrate how one goes about extending a basic application, we introduce the requirement of rendering a donut chart showing the relative proportion of Supeheros of each Squad (i.e. Marvel vs. DC). This involves three steps:
- Defining a Repository component with a suitable query. We will use a
group byquery. - Invoke the method in Repository component implementing the query, and exporting the query result to the listing view. This will be done from the
SuperheroController.list()method. - Add a Chart widget to the listing view Superhero Table (e.g. between the filter and the table), and configured appropriately..
In addition to Web Controller components as the one we created earlier, App Studio supports additional categories of components. Such as Rest Controllers, Managers, Repositories, and Event Listeners. A common pattern is for each Entity in a project to have one of each of these components, namely Repositories to define custom queries, and Managers to perform business functionality beyond pure DB quering. Managers and Respositories are implicit created by the App Studio to cover basic operations, while the other types of components which implements different kinds of presentation layers should be created explicity – often using the built-in templates as starting point.
For the Superhero app we want to create a custom Repository to add a custom query to group and count the number of Supeheros in each Squad. On project tab Components, click Add Component. Select component type Repository, and component template Entity CRUD. Select entity Superhero. Leave the other settings with default values. This will create a component named SuperheroRepository.
Confirm that the component SuperheroRepository is create with success, with several query methods created. These repository methods don’t have body made of instructions, rather they represent queries whose semantic is inferred form the name of the method or for more advanced use case from explicit query clauses. The methods already created implement basic CRUD functionality – i.e. create, retrieve one or many, update, and delete, for instances of Superhero. We now want to add one additional method name countGroupBySquad().
In the dashboard of component Superhero controller, click Add Method to open the method creation modal. Enter method name countGroupBySquad(), without any parameters. Confirm that the method is created and shows up below the other pre-generated methods. This method will return a list of maps (key-value pairs) of the form {count=N, squad=Squad}.

Comments and Discussion