Cloud Manager » Setting Up Markeplace Solutions
CloudManager allows for administrator to setup marketplace Solutions for users convenience and easy install of commonly used software. This is somewhat comparable to setting upa Solution Repository but somewhat simpler to prepare. Namely, each Solution is setup standalone using the admin UI, does not require necessarily an external configuration or manifest file, and does not need a repository index to be prepared.
Listing Solutions
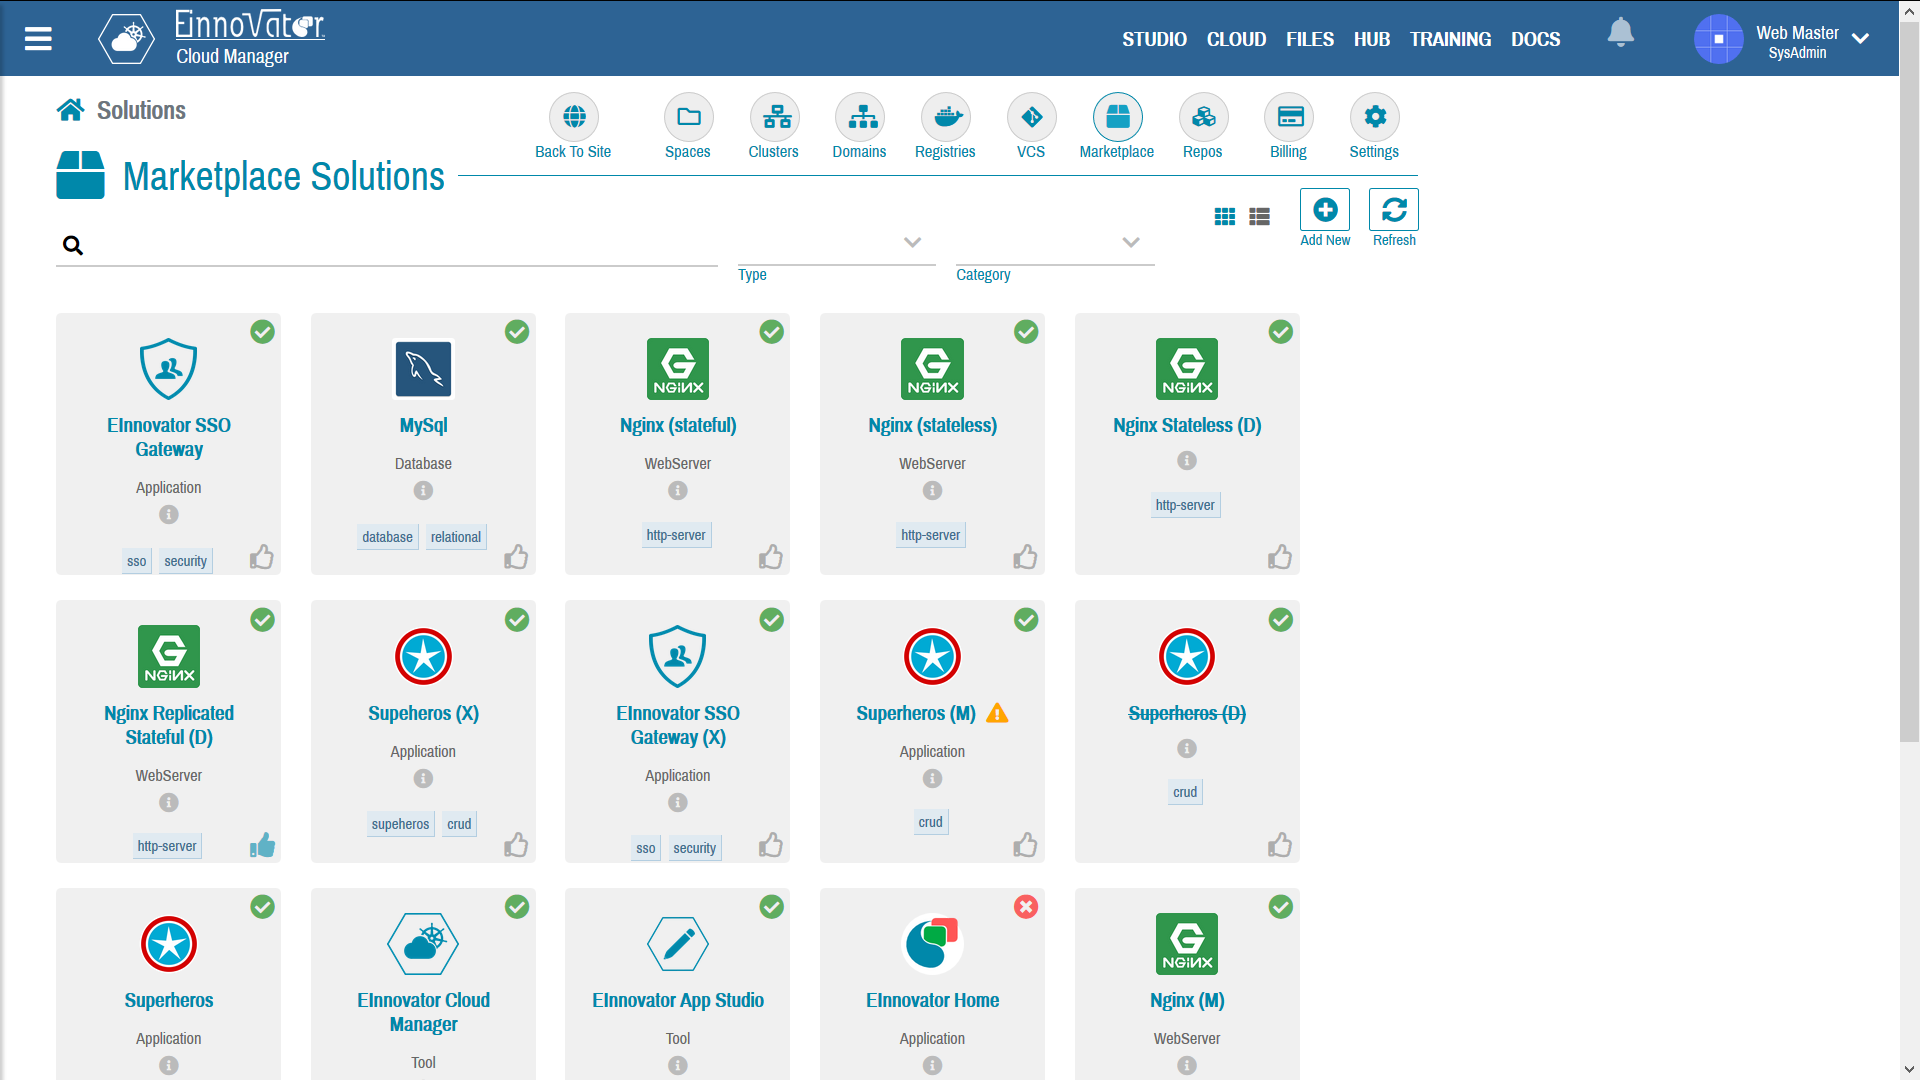
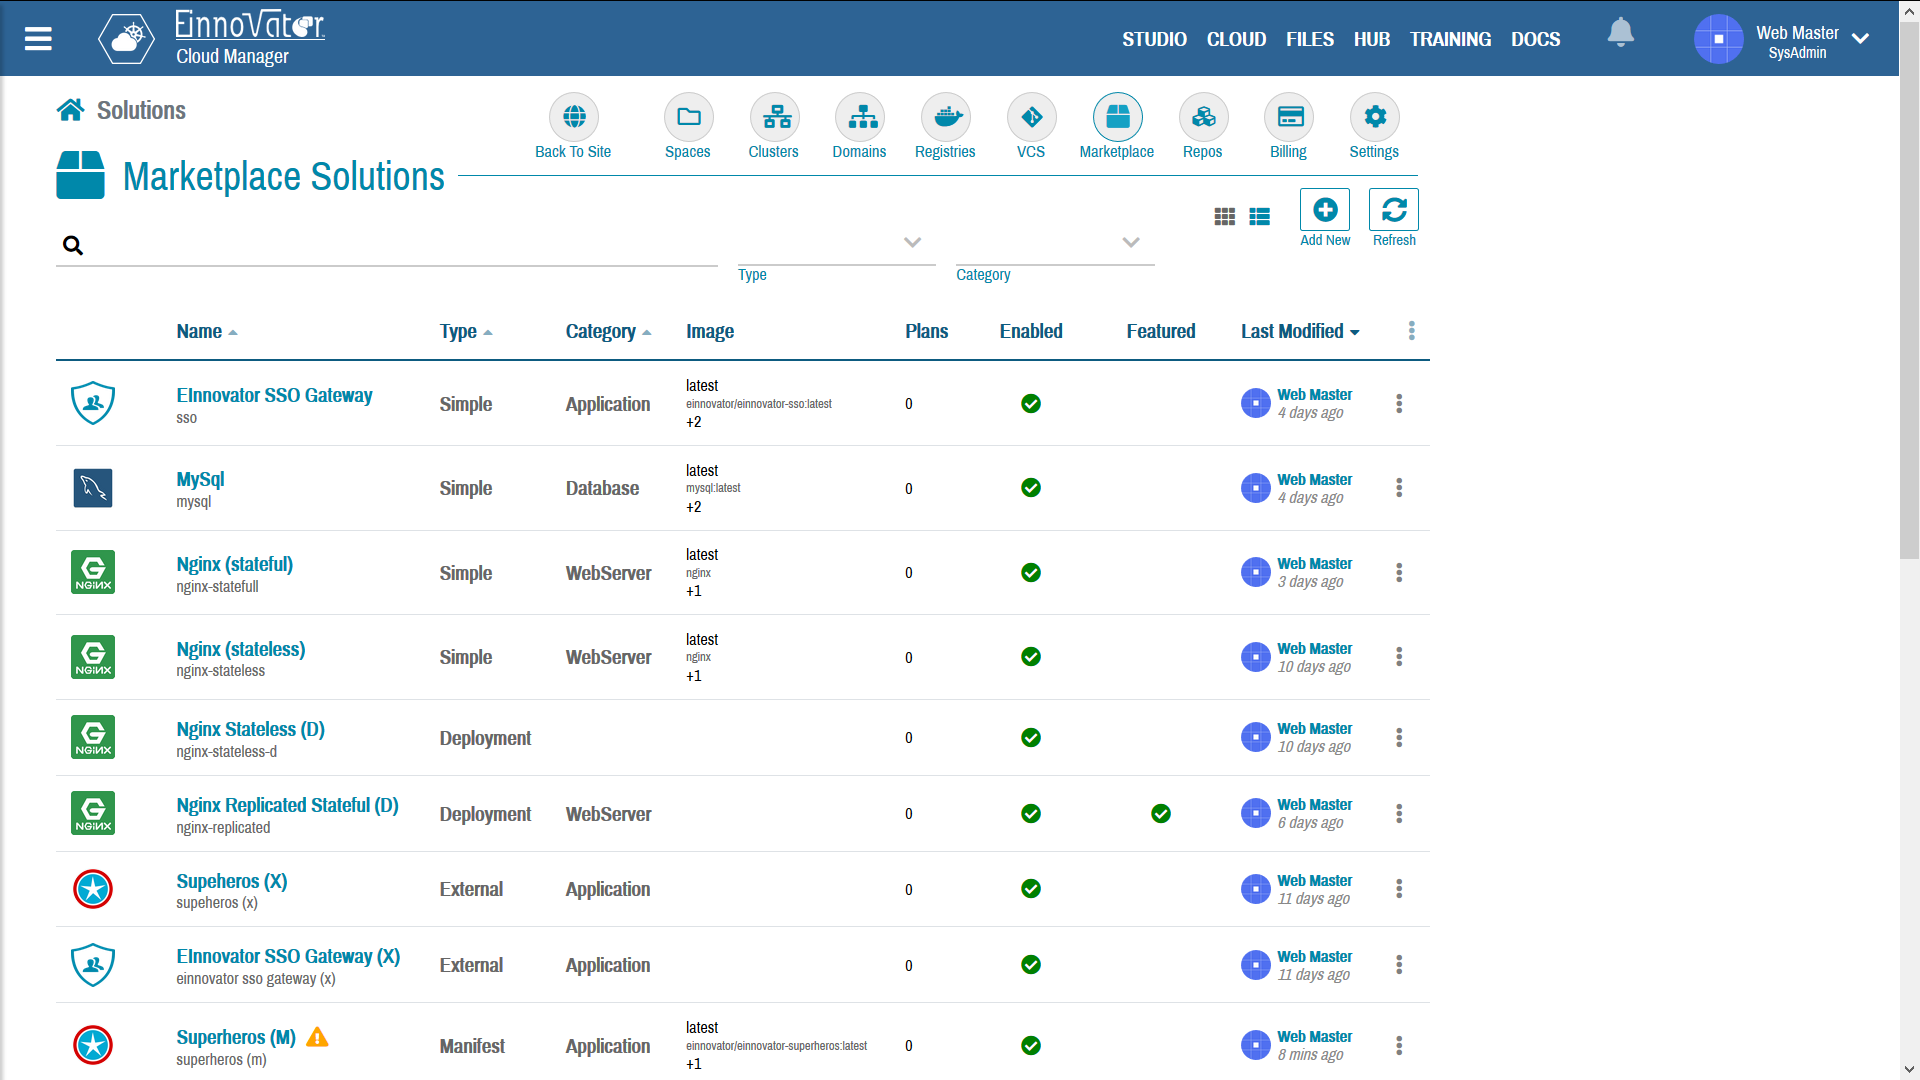
The button Marketplace in the top-right toolbar navigates to the list of solutions currently setup. Solution can be listed in grid view or table view.
Each solution has four boolean flags that define its visibility of the user:
- Enabled — Only enabled Solution are visible to the user. Non-enabled solutions are useful for admins to edit and experiment with it before making it available to users. Or conversely, to keep them around after they are retired or deprecated. By default, at creation time solutions are set as enabled unless the admin modifies this.
- Featured — Feature Solutions are displayed in the user home dashboard. The are intended to be highlighted as highly-recommend or highly-used software solution. But apart from that, they behave in exactly the same way as non-enabled solutions. All enabled solutions, featured or not featured, are visible to users in the solution marketplace grid.
- Deprecated — Solutions marked as deprecated are visible to users but their use in not recommended (e.g. because other alternative solution is preferred, or a more recent version of the software configured and packaged in other solution is available). Visually a strike-trough font decoration is used indicate that a solution is deprecated.
- Unstable — Solutions marked as unstable are visible to users but their use in production is not recommended (yet) for production (e.g. because its still in prototype, beta, on non GA stage). Visually a warning icon is displayed to indicate that a solution is unstable.
The grid view of the solution list allow the flags Enabled and Featured to be toggle easily by clicking two icons. The other flags can be edited in the edit form along side with other details.
Images below show a snapshot of a collection of setup solutions as grid (left-hand side), and as list (right-hand side)::
Creating Solutions
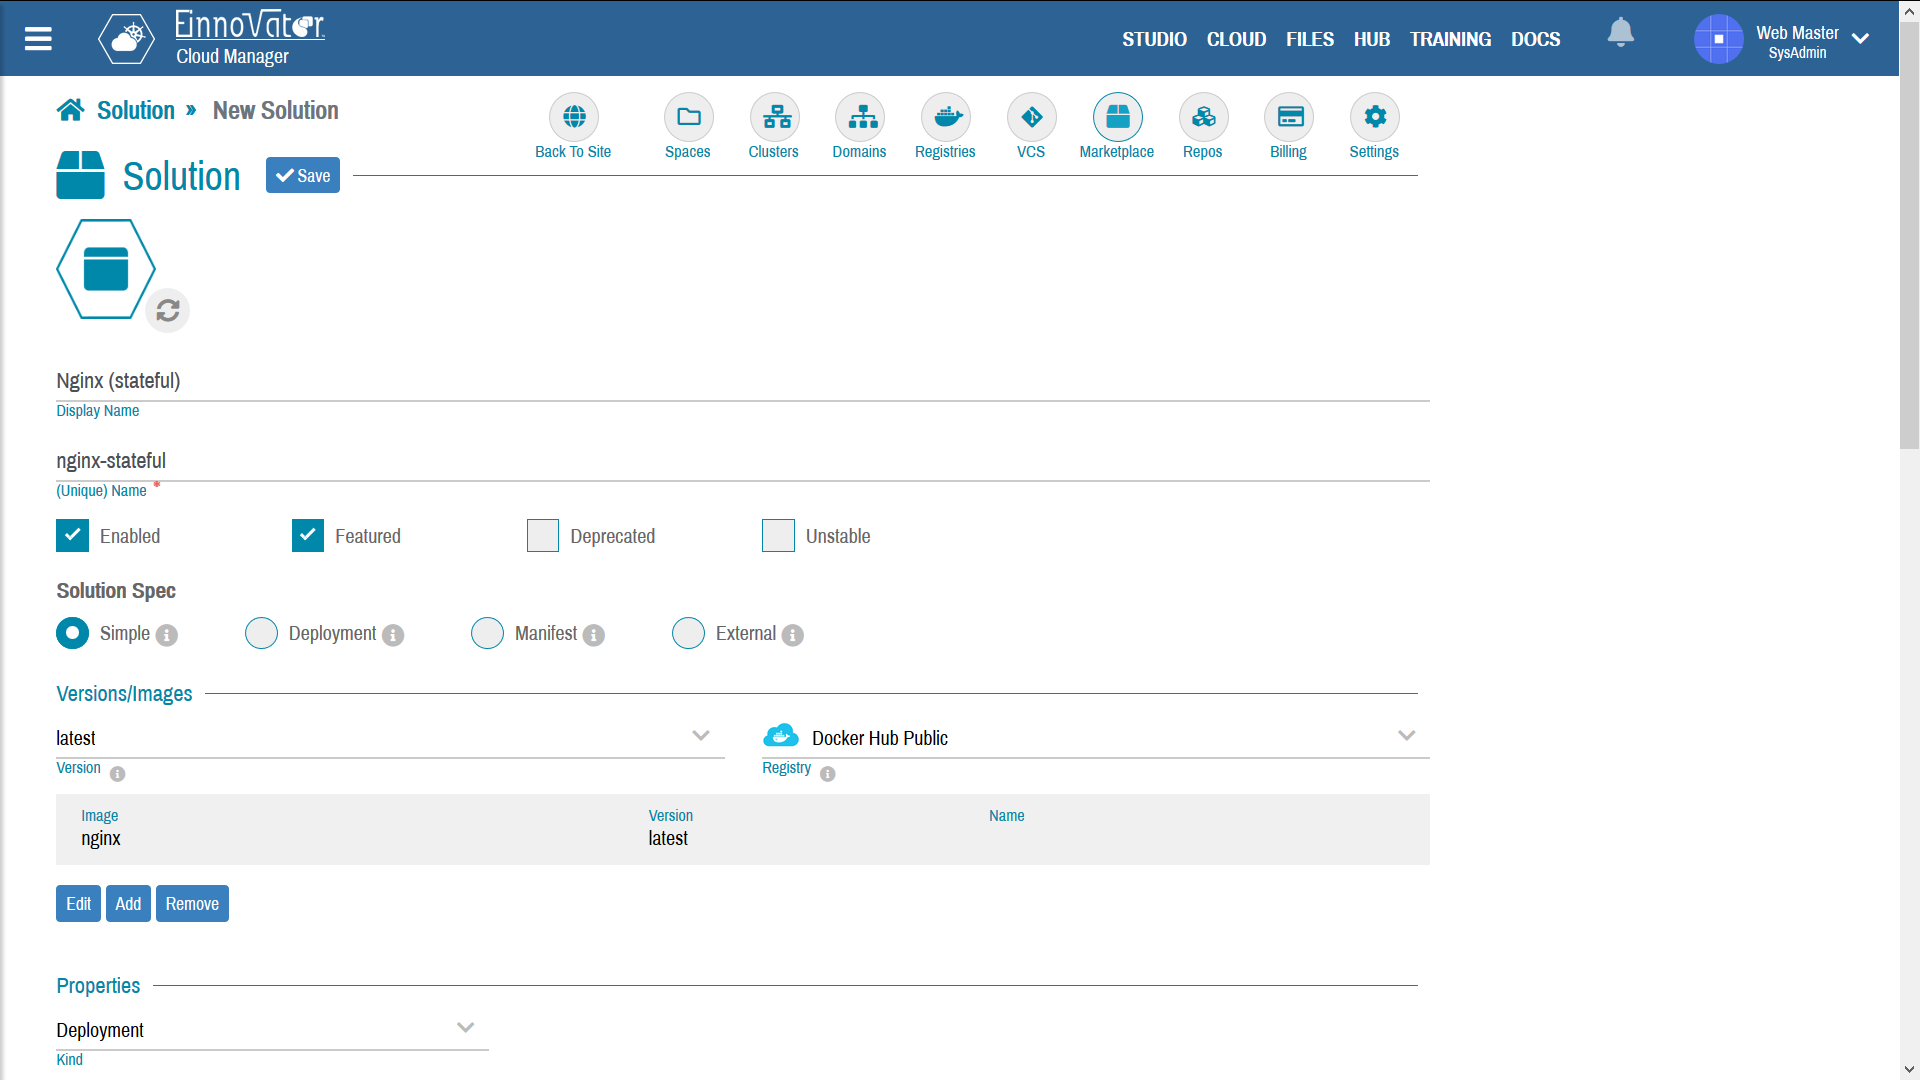
The button Add New in the solution listing toolbar open the form to create a new Solution. Each solution defines a specification how a particular software should be installed. There are four types of Solutions in CloudManager, each using a different approach to define the solution’s specification.
- Simple — All configuration details are defined using form fields in the admin UI. This includes one or more (Docker) images corresponding to different versions of the software, and a variety of resource installation and descriptive details such mounts of persistent volumes, environment variables, etc.
- Deployment — A Deployment pre-installed in some Space is used as blueprint to create new Deployment in the Space selected by the user.
- Manifest — A manifest file is used specify the resources created on installation. The manifest file is edited directly on CloudManager with a built-in editor.
- External — An external configuration file is use to specify the configuration.
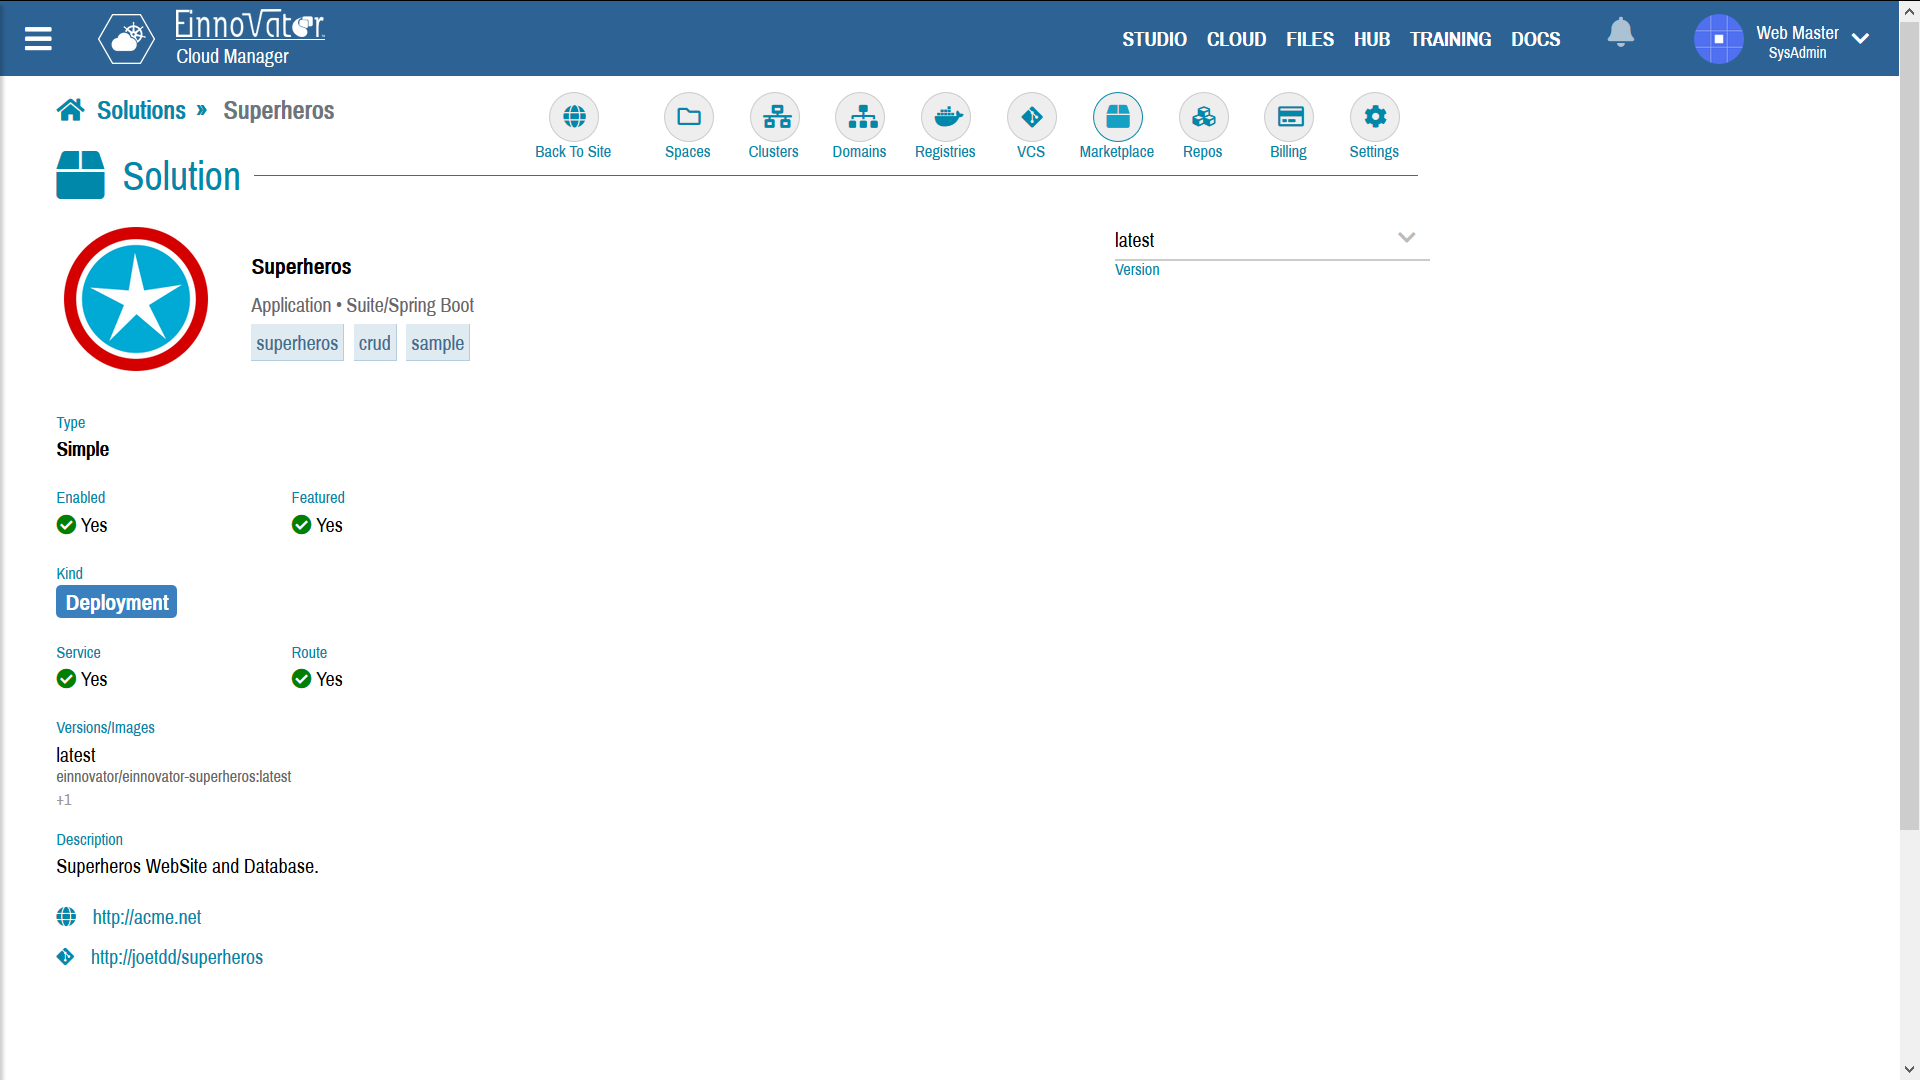
Image below show the details of an image after creation:
Solutions with Explicit Settings
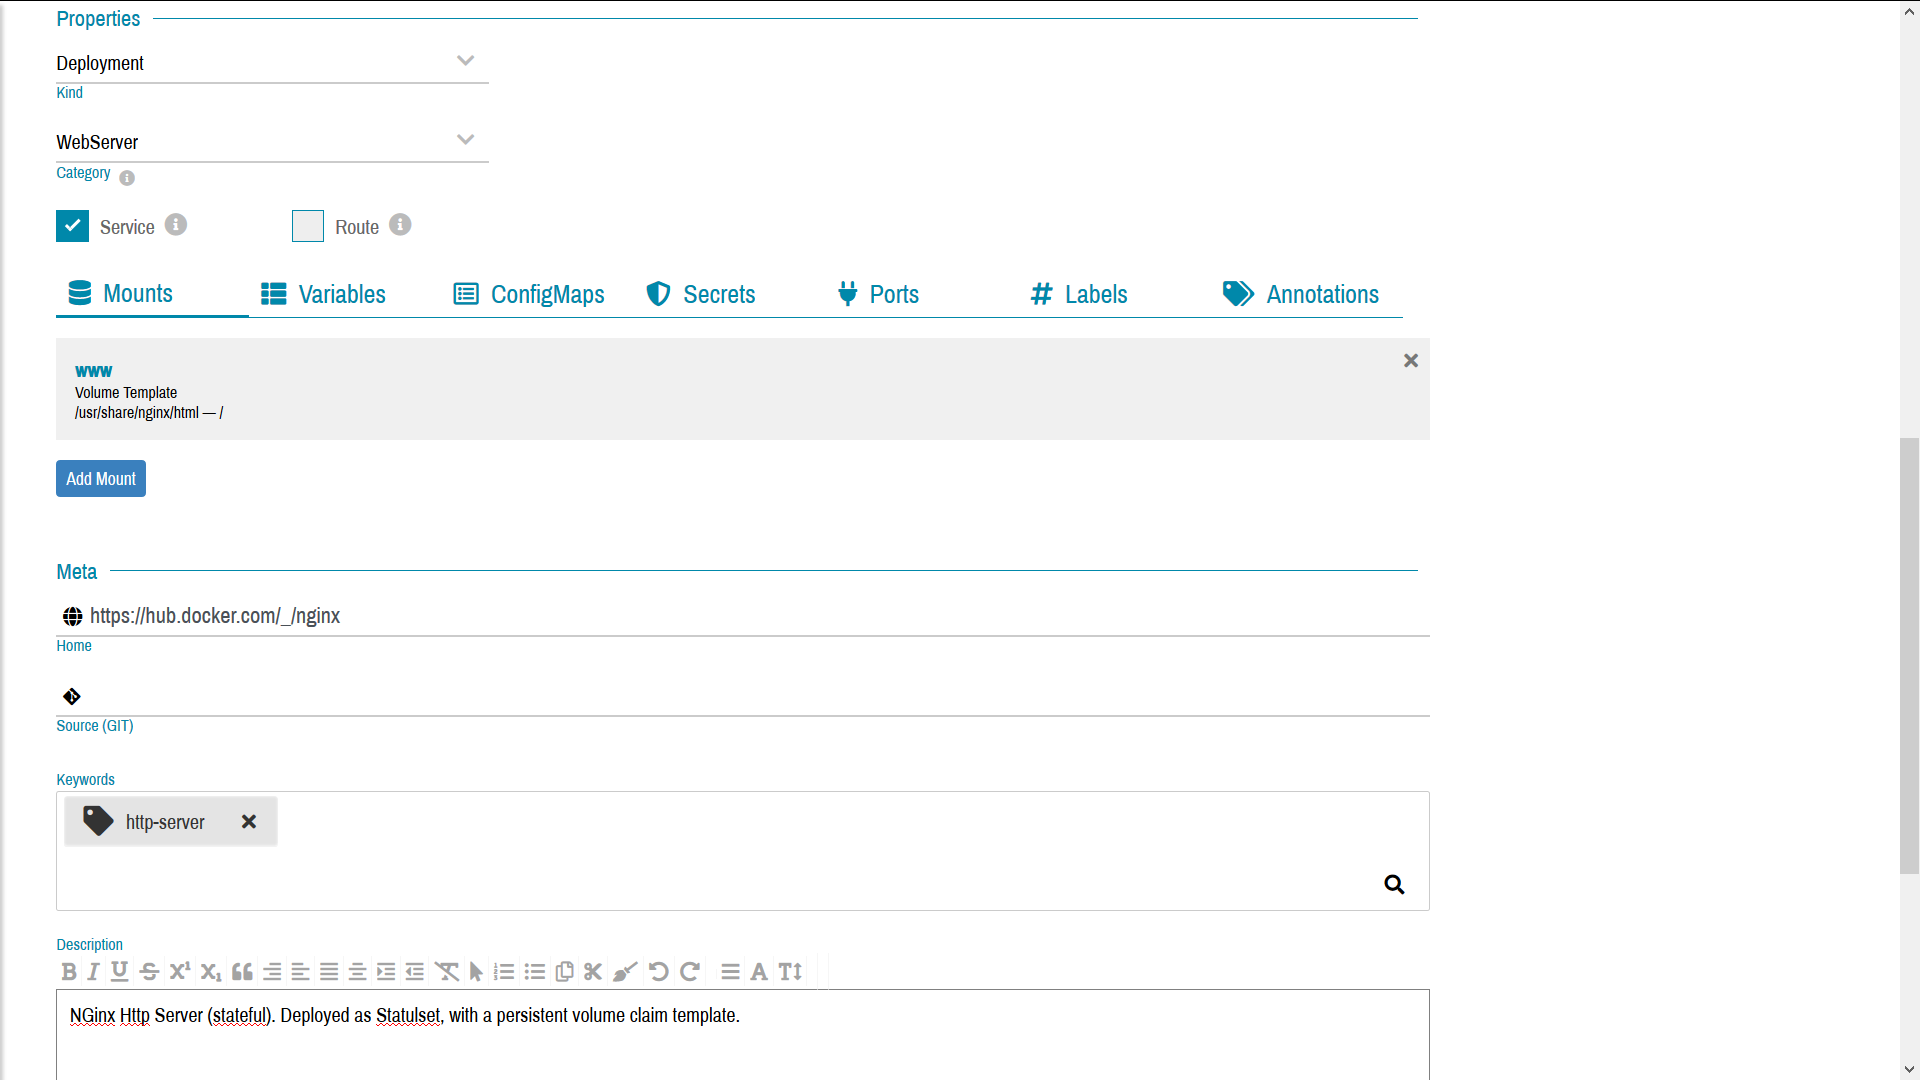
For Solution of type Simple all configuration details are defined using form field in the admin UI. This includes one or more (Docker) images corresponding to different versions of the software, mounts of persistent volumes, environment variables, ports, ConfigMaps and Secrets to be created automatically if required, and a variety of descriptive details. This approach is designated as “Simple” because it does not requires external resources to be setup before hand, nor it requires administrators to delve into the “low-level” details of Kubernetes manifest files. Some of the files specified in this approach can also specified using some other approach. Table below summarize the fields that specified are specified in this approach. Field marked with * are required.
| Field | Type | Simple | Deployment | Manifest | External | Description |
|---|---|---|---|---|---|---|
| (icon) | URL | Yes | Yes | Yes | Yes | Uploaded icon/image/thumbnail |
| DisplayName | String | Yes | Yes | Yes | Yes | Descriptive Name of Solution |
| Name | K8s ObjectID | Yes* | Yes* | Yes* | Yes* | Default name for created Deployment |
| Type | DeploymentType | Yes* | No | Yes | No | Flag specifying if a service should be created |
| Category | SolutionCategory | Yes | No | Yes | No | Optional descriptive category of the Deployment |
| Stack | Stack | Yes | No | Yes | No | Optional descriptive stack of the Deployment |
| Service | Boolean | Yes* | No | Yes | No | Flag specifying if a service should be created |
| Images | Image[] | Yes* | No | Yes | No | One or more Docker Images |
| Registry | Registry | Yes* | No | Yes | No | Registry to pull images from (Default: is DockerHub) |
| Mounts | Mount[] | Yes | No | Yes | No | Optional persistence volume mounts of category Volume or VolumeTemplate. |
| Environment | Variable[] | Yes | No | Yes | No | Optional environment variables to configure Deployment |
| ConfigMaps | ConfigMap[] | Yes | No | Yes | No | Optional ConfigMaps to be created in Space where Deployment is installed. |
| Secrets | Secret[] | Yes | No | Yes | No | Optional Secrets to be created in Space where Deployment is installed. |
| Ports | Port[] | Yes | No | Yes | No | Optional Ports of Deployment and Service |
| Labels | { key: value } | Yes | No | Yes | No | Optional Labels of Deployment and Service |
| Annotations | { key: value }* | Yes | No | Yes | No | Optional Annotations of Deployment and Service |
| Home | URL | Yes | Yes | Yes | Yes | Web home-page of the solution project |
| Source | URL | Yes | Yes | Yes | Yes | Source repository of the solution project (if open source) and/or client libraries |
| Description | Long String | Yes | Yes | Yes | Yes | Informative text description of the Solution |
Images below show a snapshot of a solution of type StatefulSet for docker image nginx being defined:
The installation act by a user results in the creation of several resources, namely:
- Deployment — A managed Deployment usually of type Deployment for stateless installations and StatefulSet for stateful ones.
- Service — (Optional) A serviced use to expose endpoints of the Deployment
- ConfigMaps — (Optional) One or more ConfigMaps with configuration details for the application.
- Secrets — (Optional) One or more ConfigMaps with configuration details for the application.
- Route/Ingress – (Optional) A DNS route to make the service and deployment accessible using an HTTP URL.
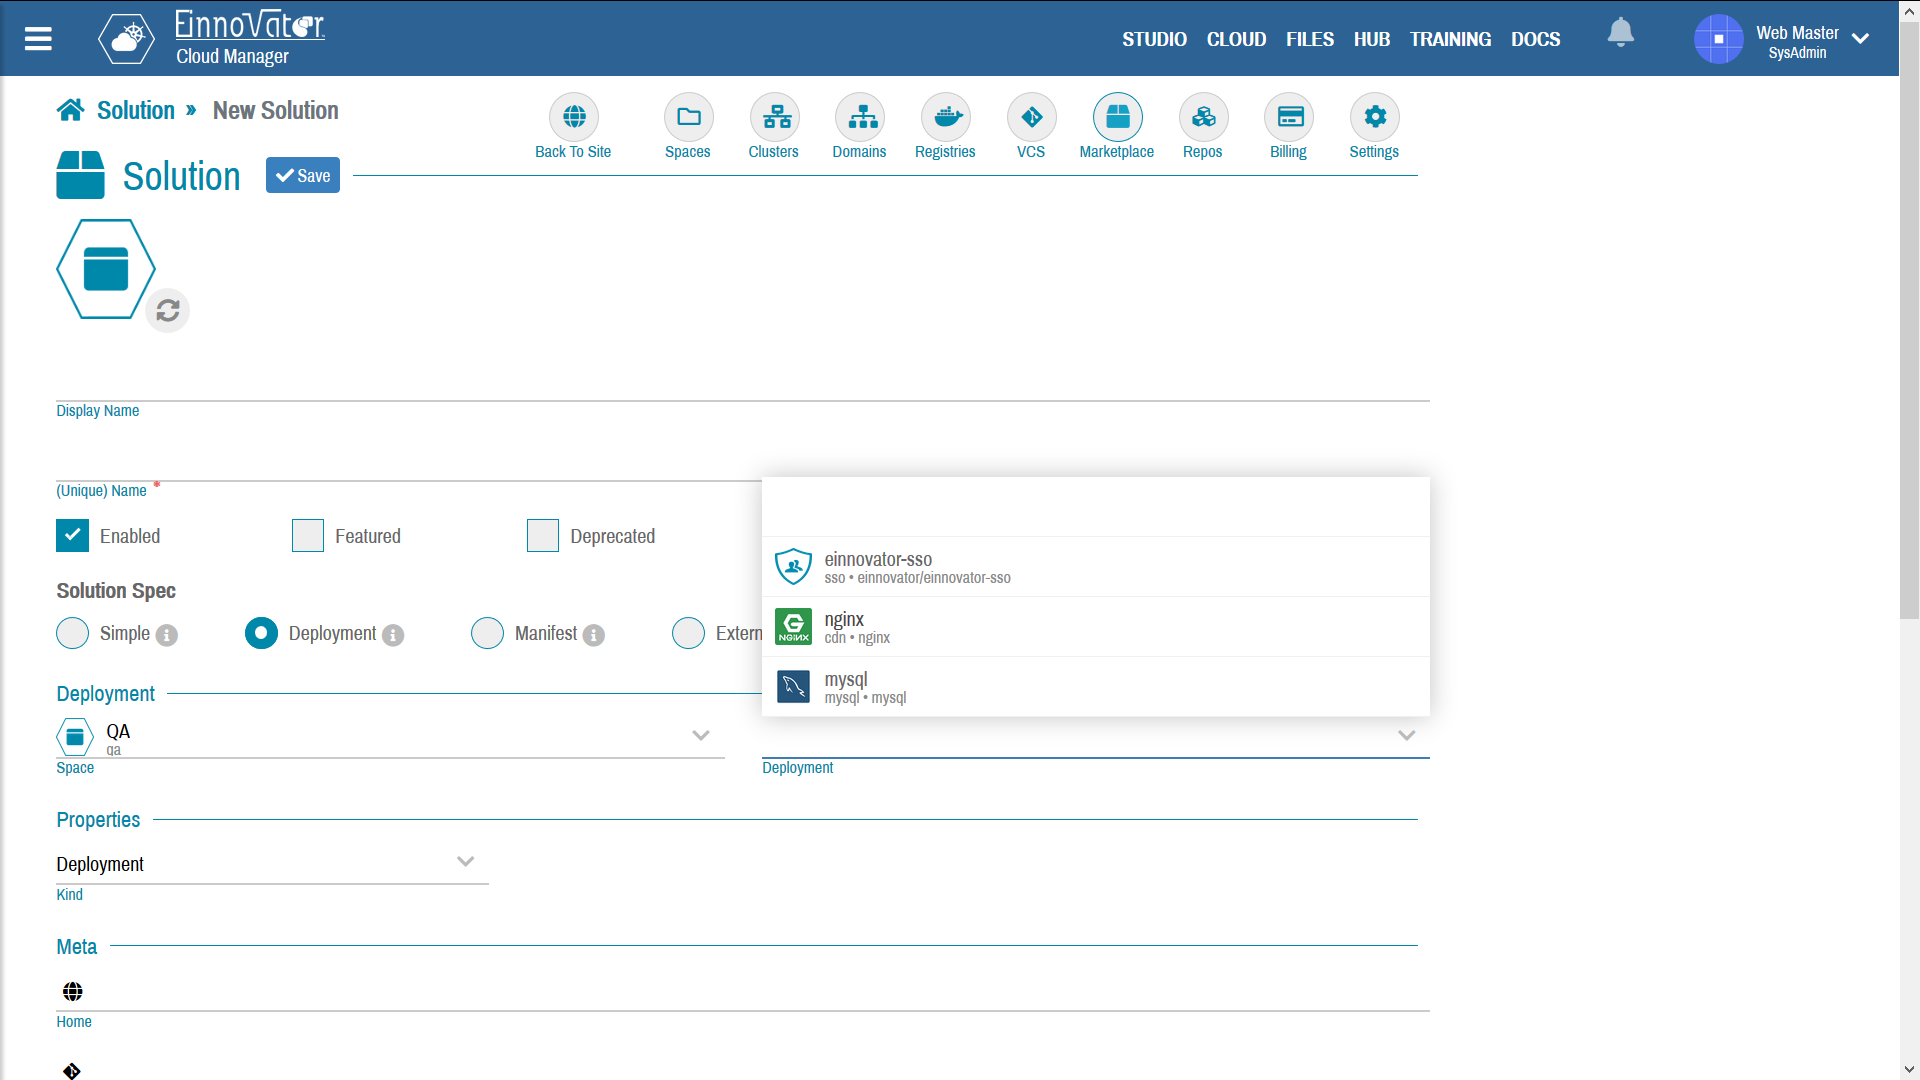
Solutions from Deployments
A solution of type Deployment requires a managed Deployment to be pre-configured in some Space. This Deployment is used as blueprint (a.k.a. prototype or template) to create new Deployment in the Space selected by the user. All the settings defined in the blueprint are copied to the newly created Deployment , including Docker image, environment variables, volume mounts, and advanced K8s deployment options.
The Deployment used as solution blueprint can be running or stopped, and does not have any runtime relation with the installed clone. Any changes made to settings of the prototype Deployment not not have effect on previous installations. The user making use of the solution does not need to have permission to the Space where the blueprint deployment is defined.
The blueprint Deployment itself can be defined in any of the approaches supported by CloudManager, namely:
- Simple — Explicit settings defined in the UI, including Docker image and registry to use, type of deployment, and advanced K8s settings.
- Manifest — Built-in manifest edited in the UI. Using same syntax as is used for the reusable solution manifest files.
- External — External manifest file. Similar to solutions external configuration with manifest.
Images below show a snapshot of a solution of type StatefulSet for docker image nginxbeing defined.
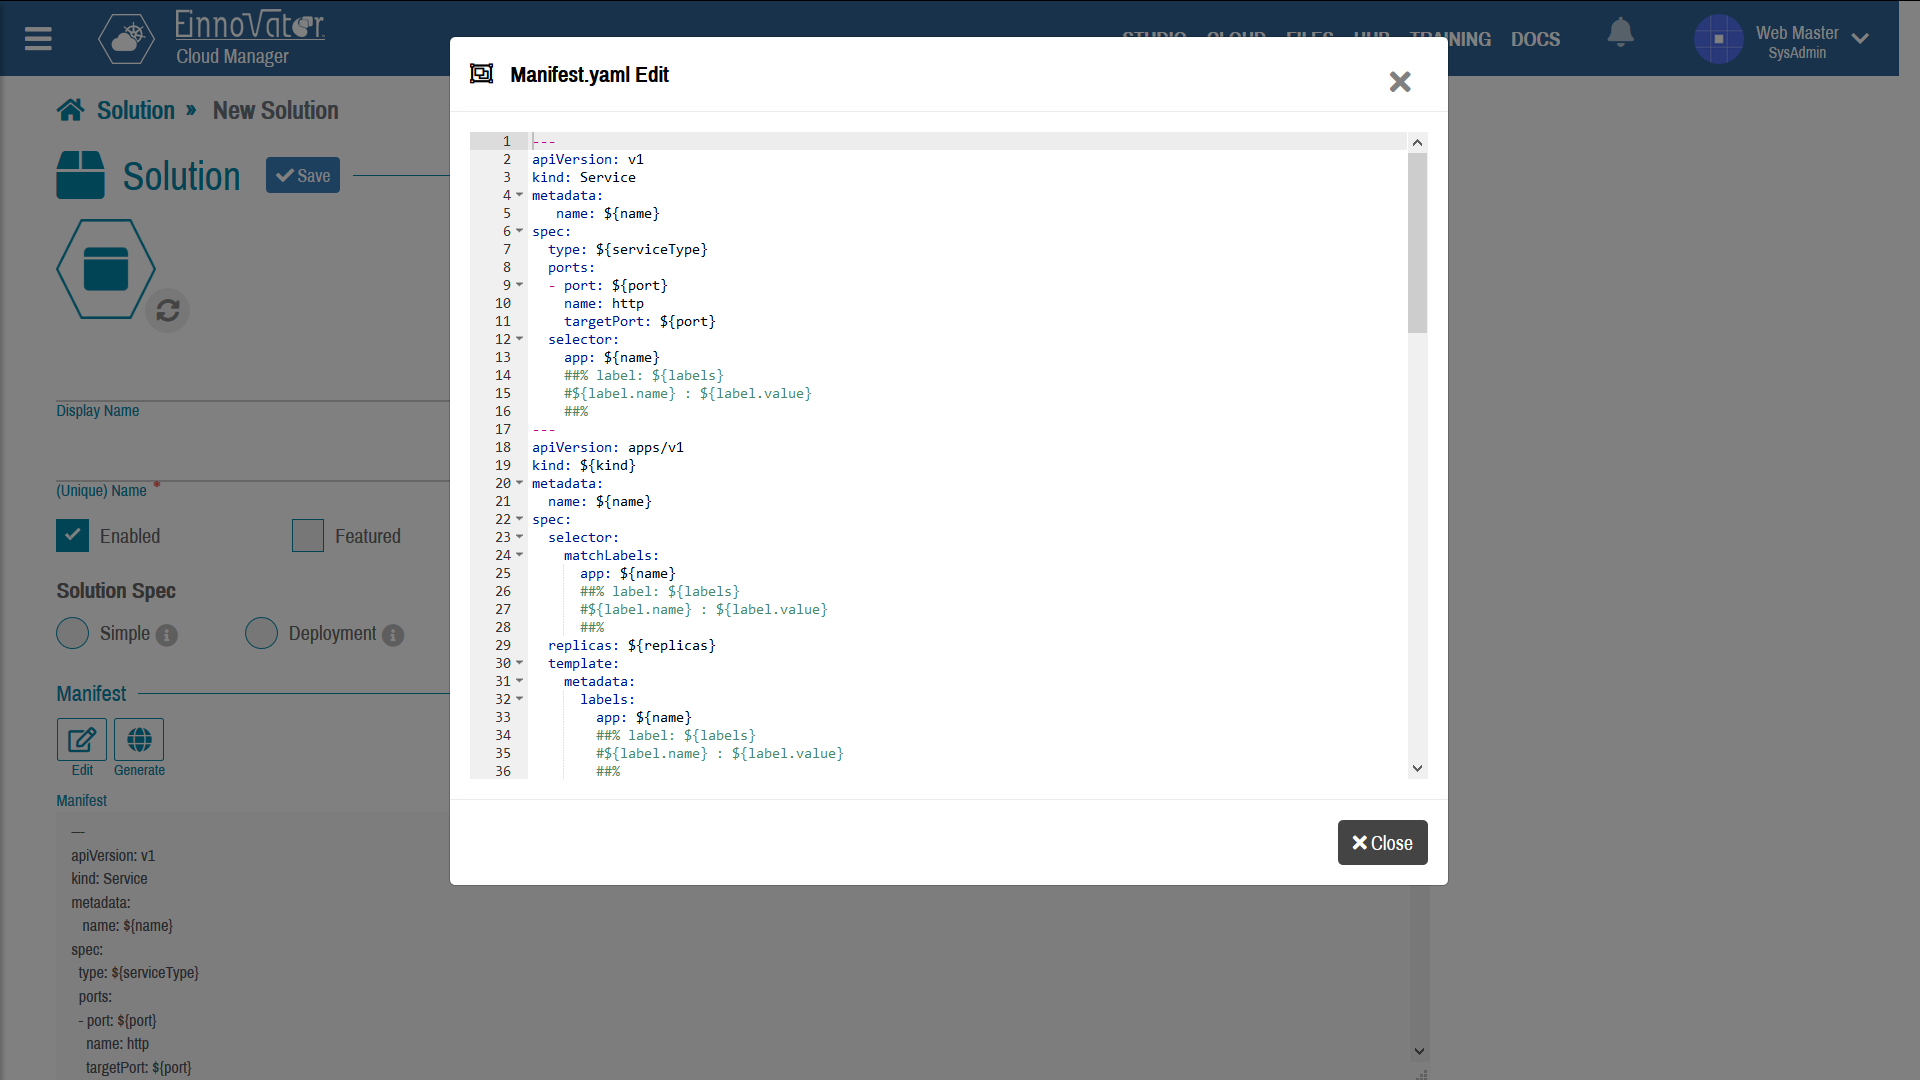
Solutions with Manifest
A solution of type Manifest specifies the resources to be created during installation using an (extended) manifest YAML file. This is a Kubernetes manifest file but with some extensions including variable placeholder, expression evaluation, and directives. The manifest file is edited directly on CloudManager with a built-in context-sensitive YAML editor. A toolbar action (button) is also available to generated the manifest automatically, that can be further tweaked to accomadate specific use cases.
Many of the fields available in the Simple type of solution, can also be specified when selecting the Manifest type. This values can be referenced in the manifest file using property placeholder ${variable}. Some of this variables can be modified by the user at install time, such name of deployment, instance count, and resource limits/sizes such as memory and storage.
Below we show an example of a manifest file to install a single instance (non-replicated) MySql database as a StatefulSet with a persistent volume, and a service, that references variables:
---
apiVersion: v1
kind: PersistentVolumeClaim
metadata:
  name: ${name}
spec:
  storageClassName: do-block-storage
  accessModes:
    - ReadWriteOnce
  resources:
    requests:
      storage: ${mount.size}
---
apiVersion: apps/v1
kind: Deployment
metadata:
  name: ${name}
spec:
  selector:
    matchLabels:
      app: ${name}
  strategy:
    type: Recreate
  template:
    metadata:
      labels:
        app: ${name}
    spec:
      containers:
      - image: mysql:5.6
        name: ${name}
        resources:
          limits:
            memory: ${resources.memory}
          requests:
            memory: ${resources.memory}
        env:
        - name: MYSQL_ROOT_PASSWORD
          value: ${MYSQL_ROOT_PASSWORD}
          #valueFrom:
          # secretKeyRef:
          #    name: ${name}
          #    name: password
        ports:
        - containerPort: 3306
          name: mysql
        volumeMounts:
        - name: data
          mountPath: /var/lib/mysql
      volumes:
      - name: data
        persistentVolumeClaim:
          claimName: ${name}
---
apiVersion: v1
kind: Service
metadata:
  name: ${name}
spec:
  ports:
  - port: 3306
    targetPort: 3306
  selector:
    app: ${name}
The extended manifest file also support directives that are syntatically disguised as YAML comments prefixed with #.
- Conditionals — Start with
#? ${expression}ends with#.. - Iteration — Prefixed with
#& var[,iterator] : ${expresion} [ | filter] - Assignment — Prefixed with
#% var = ${expression}, ...
Image below shows a snapshots how a solution being created and manifest being edited with built-in editor:
Solutions from External Spec
A solution of type External requires an external file is to be provided with the specification or configuration of the solution. This is the approach that requires less information to be provided in the UI. Three types of external configuration files are currently supported.
- Spec — A YAML specification file, containing all the detail contains all the information required to define the installation details.
- Manifest — An external manifest file defines the resources to be installed. Similar to the built-in Manifest approach, but the manifest file is external. This is useful when a K8s manifest file pre-exist and is available in a public URL.
- Helm — A standalone Helm Chart packaged as a
.tgzfile. Does not require a repository index.
For type Spec the YAML file specified the values of all the fields that would otherwise be specified in the admin UI. Support additional features not supported in the UI such as plans (a.k.a. installation profiles). Each plan defines field values that override the defaults of the the default setting for the solution. Below, we show two examples of YAML spec — one with no plan details, and another with multiple plans.. For example, an HTTP service can have two plans – one stateless and one stateful, or a DB can have two plan one non-replicated and one replicated.
In the solution spec below we show an how to configure a single instance (non-replicated) MySql database as a StatefulSet with a persistent volume. The default name of the deployment, and permanent storage size defined in the specification can be overrideen by user at installation time:
name: mysql
displayName: "MySql DB"
kind: STATEFUL_SET
category: DATABASE
img: "https://cdn.einnovator.org/img/solution/mysql2.png"
description: "MySQL open-source relational database (RDBMS)."
home: "https://hub.docker.com/r/mysql/mysql-server"
enabled: true
featured: true
labels:
  app: ${name}
manager:
  displayName: mysql
versions:
  - version: latest
    image: "mysql"
  - version: 8.0
    image: "mysql:8.0"
  - version: 5.7
    image: "mysql:5.7"
  - version: 5.6
    image: "mysql:5.6"
mounts:
  - name: data
    type: VOLUME
    mountPath: /var/lib/mysql
    size: 1
ports:
  - port: 3306
    name: mysql
env:
  - name: MYSQL_ROOT_PASSWORD
    category: SECRET
    secret: credentials
    path: password
secrets:
  - name: credentials
    data:
      password: ${password}
keywords:
  - database
  - relational
  - rdbms
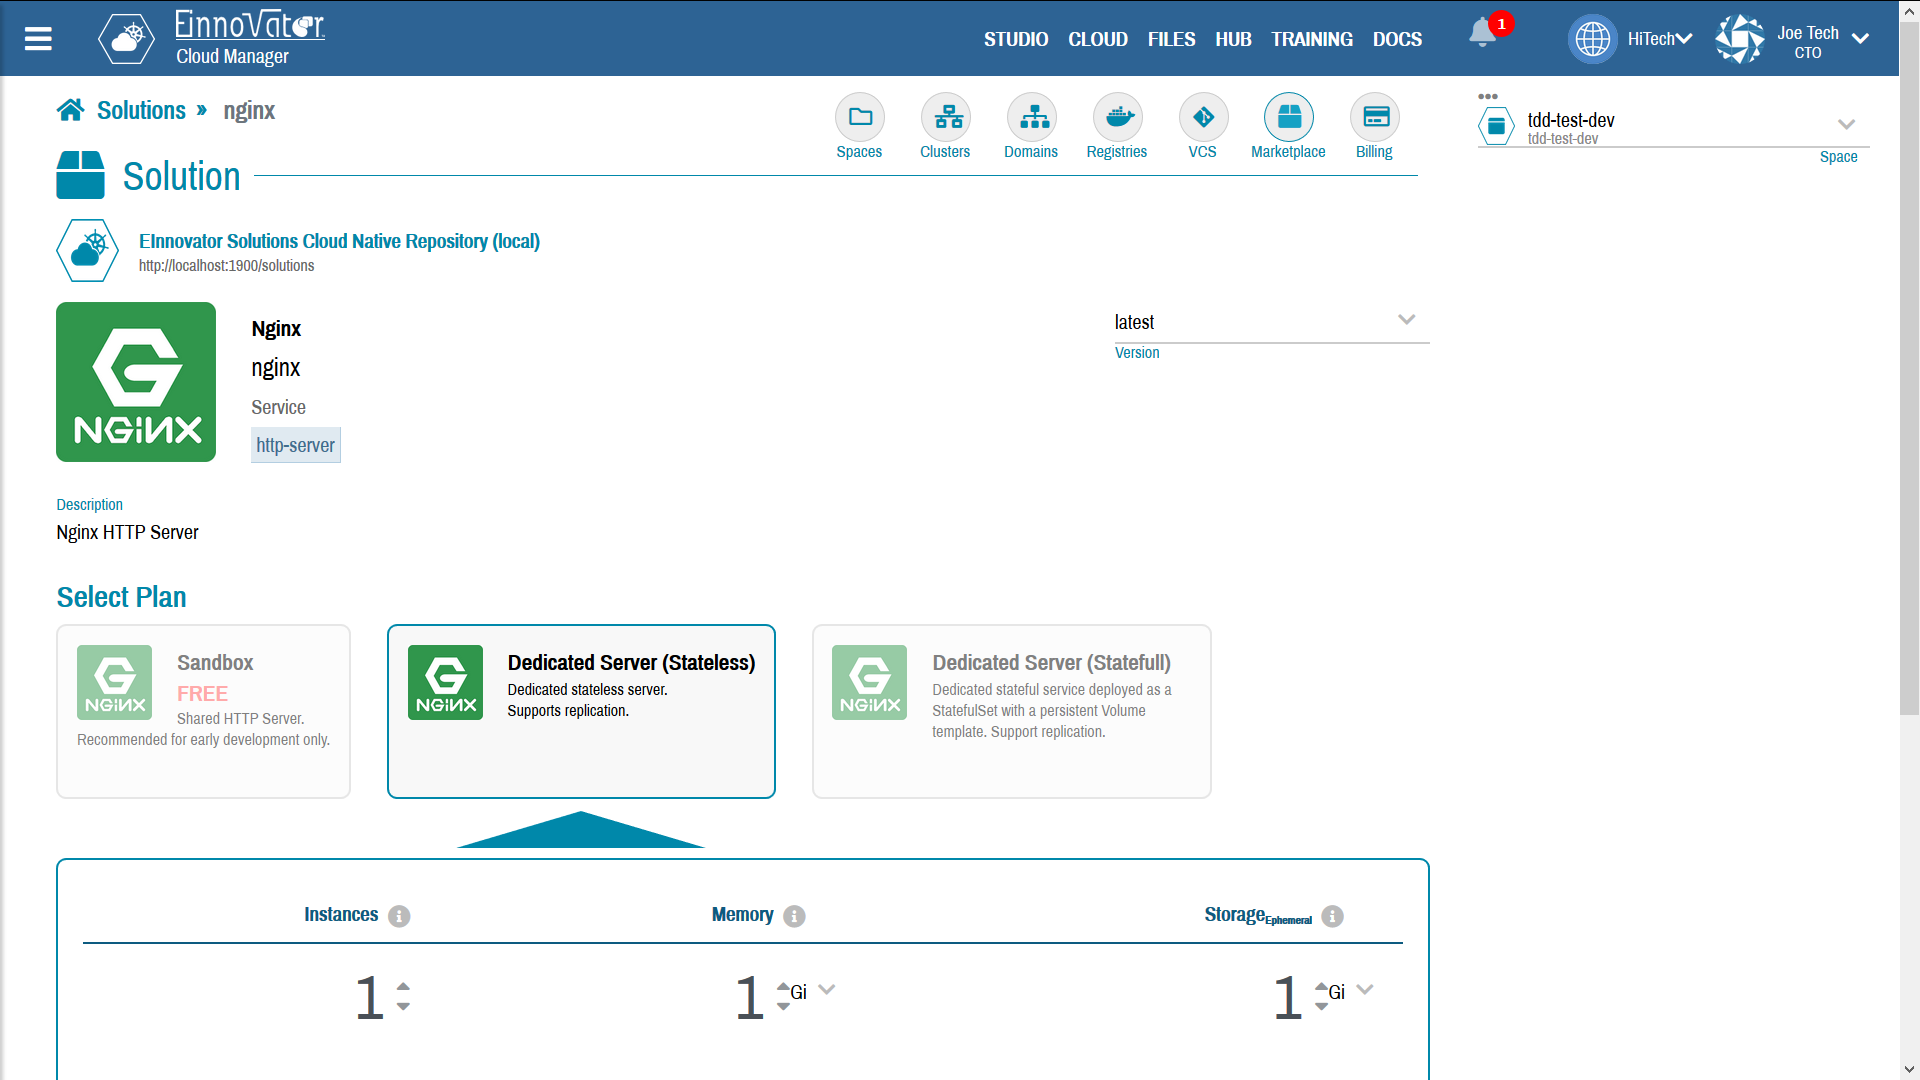
The solution spec below show how to configure HTTP service nginx with two plans — a stateless plan to deploy a Kubernetes Deployment (and respective ReplicaSet(s) and Pod(s)) with ephemeral storage, and a stateful plan with a persistent volume. At installation type the user is prompted by the UI to select which plan to use.
displayName: "Nginx"
category: SERVICE
kind: DEPLOYMENT
name: nginx
img: "https://cdn.einnovator.org/img/solution/nginx.png"
description: "Nginx HTTP Server"
enabled: true
featured: true
service: true
route: true
nobinds: true
ports:
  - port: 80
    name: http
versions:
  - version: latest
    image: "nginx"
  - version: 1.16
    image: "nginx:1.16"
labels:
  app: ${name}
images:
- name: nginx
  repository:
    name: docker
keywords:
  - http-server
resources:
  disk: 1Gi
  memory: 64Mi
plans:
- name: Stateless
  description: "Stateless deployment with ephemeral storage."
- name: Stateful
  description: "Stateful deployment with a permanent storage."
  kind: STATEFUL_SET
  mounts:
    - name: www
      type: VOLUME_TEMPLATE
      mountPath: /usr/share/nginx/html
      size: 1
Image below shows a snapshots how the installing UI as seen by the user:

Comments and Discussion