App Development with EInnovator Microservices Suite and Spring Boot
EInnovator Microservices Suite provides a set of generic core services that can be used to quickly bootstrap new applications, prototype new products and business ideas, and refactor existing monoliths.
EInnovator Cloud is a Kubernetes based cloud environment where developer’s own applications can be easily deployed along side with core microservices and other marketplace solutions.
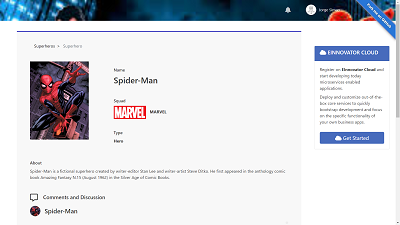
In this tutorial, I provide a practical guide on how to get started developing Spring Boot applications with the Java client libraries for the EInnovator Microservices Suite, and how to deploy apps to EInnovator Cloud. As illustration, I show how to create a web application to CRUD manage a database of Superheros.
The complete end-result / solution of this tutorial is available on this Github repository, and deployed on EInnovator Cloud in http://superheros.samples.nativex.cloud.

Getting Started: Creating the Project
The best and fastest way to start a new project using EInnovator Microservices Suite is to use one of the several application blueprints available from public GitHub repositories. Each blueprint layouts the “bare-bones & skeleton” for an application with specific stack and dependencies, sketches a specific data model to be refactored and extended, with a project tree that follows common conventions, and suggestive of proven architectural best-practices.
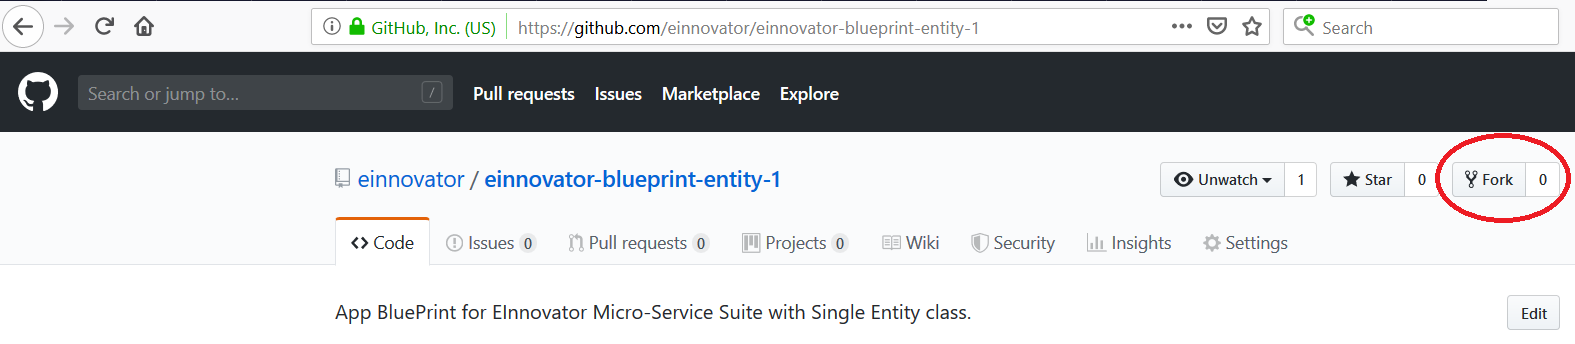
For this tutorial, we will use the blueprint einnovator-blueprint-entity-1. This blueprint is suitable to get started with a simple data-model with a single entity, based on the Spring Boot/Java stack with JPA/SpringData persistence layer. Build is based o Maven with all common dependencies for the core micro-services in the micro-service suite.
Let’s start by cloning the repository for your selected blueprint from the Github URL.
TODO 1-1: Clone the Github repository of the app blueprint.
git clone https://github.com/einnovator/einnovator-blueprint-entity-1.git
Alternatively, case you want to push your project back to Github, you can fork the repository and cloning your fork.
Once you clone the project, you should import it into your favorite IDE. For example, if using Eclipse or STS, you can import as a Maven Project, or as a Git project from a local repository. Intelij has similar menu options to import Maven and Git projects. Any other code editor, IDE or otherwise, can be used as well, although having options to refactor code easily will become handy below.
TODO 1-2: Import the blueprint project.
In the following section, I will explain how to go from the basic blueprint to the Superheros application.
Dependencies
Because the blueprint is build with Maven we can find in the pom.xml the set of dependencies already setup. In particular, take notice in the dependencies for the client libraries (as Spring Boot starters) for the EInnovator core services, plus some utilities libraries. Good part of this tutorial involves explaining the configuration and/or bits of the Java API provided by these starters and libraries.
einnovator-jpa-util— utility library useful when building JPA based projects. It also bring automatically two other utility libraries:einnovator-utilandeinnovator-common.einnovator-sso-stater— Client library to connect to EInnovator SSO Gateway for user authentication and role-based access control.einnovator-notifications-stater— Client library to connect to EInnovator Notifications Gateway to define custom notifications, and allow users to check their notifications.einnovator-documents-stater— Client library to connect to EInnovator Document Store to allow for cloud storage of application files (e.g. Superheros avatares).einnovator-social-stater— Client library to connect to EInnovator Social Service used in this app to have messaging channels on eachSuperherodetails page for fan users to post comments.einnovator-payments-stater— (Optional) Client library to connect to EInnovator Payments Gateway to support in application payments (e.g. Superheros avatares). Not used in this tutorial and app, so you may prefer to comment or remove.
<dependency>
	<groupId>org.einnovator</groupId>
	<artifactId>einnovator-jpa-util</artifactId>
	<version>${einnovator.version}</version>
</dependency>

<dependency>
	<groupId>org.einnovator</groupId>
	<artifactId>einnovator-sso-starter</artifactId>
	<version>${einnovator.version}</version>
</dependency>

<dependency>
	<groupId>org.einnovator</groupId>
	<artifactId>einnovator-notifications-starter</artifactId>
	<version>${einnovator.version}</version>
</dependency>

<dependency>
	<groupId>org.einnovator</groupId>
	<artifactId>einnovator-documents-starter</artifactId>
	<version>${einnovator.version}</version>
</dependency>

<dependency>
	<groupId>org.einnovator</groupId>
	<artifactId>einnovator-social-starter</artifactId>
	<version>${einnovator.version}</version>
</dependency>
Data Model and Architecture
Check the folder and package tree of the blueprint project. Notice that it follow a layout common to Maven projects. Namely, folder src/main/java contains several sub-packages for the components of the different layers of the application. Rename the top-level project to a name more suitable for our Superheros application. You may also want to include you company or personal domain names as root package prefix.
TODO 2-1: Rename the top level project to by replacing words .blueprint.entity1 by .superheros.
The imported blueprint initially defines a single Java class named MyEntity as data model. It’s located under sub-package .model. Notice this class is annotated with JPA annotation @Entity. Use your IDE refactor the name of this class to Superhero.
TODO 2-2: Rename class MyEntity to Superhero using your IDE refactor tool.
Notice that the now renamed model class Superhero, already has has some example domain fields namely:
String name– which we can use for the name of theSupeheroString img– for the URL of an imageStatus status– as a placeholder for an enumerated.Boolean check– as a placeholder for a boolean field.- Some basic fields inherited from several
@MappedSuperclasslikeid,uuid,creationDate, etc.
In a real world use of the blueprint as a starting point to developed a new app, we could simply delete these sample fields and replace by others that make sense for the app. For this tutorial, we will use them as with some modifications.
**TODO 2-3: Add data-field to Superhero class.
- Rename enum class
StatustoSquadand fieldSuperhero.statusto `squad. Replace existing enum values with- `MARVEL(“Marvel”)
DC(“DC”)
- Rename field
Superhero.checktovillain, and corresponding setter&getter andtoString(). - Rename field
Superhero.imgtoSuperhero.avatar, and corresponding setter&getter.String nameand corresponding getter&setter methods to theSuperheroclass. Refactor also methodtoString1()to append this new field.**
Dove-tailing with the above, we should also rename other Java classes that have the words MyEntity as prefix.
TODO 2-4: Rename classes MyEntity* to have Superhero prefix.
- Rename
MyEntityRepositoryin sub-package.repositorytoSuperheroRepository. This is the Spring Data / JPA repository component for to manage persistence ofSuperheros. - Rename
MyEntityManagerin sub-package.managertoSuperheroManager. This is the service layer component to manage operation onSuperheros. Presentation layers, like web and web-services layer, always call this component. - Rename
MyEntityControllerin sub-package.webtoSuperheroController. This is the a Spring MVC based web controller that handler HTTP requests to render HTML/CSS/JS web pages. - (Optional) Rename
MyEntityRestControllerin sub-package.webtoSuperheroRestController. You may opt to delete this class, as REST web-services and service integration will be covered in other tutorial. - (Optional) Rename bottstrap class
Appin root package toSuperheroApp. - Use the IDE tool to Find&Replace across all
.java, to replace wordsentitybysuperheroand wordentitiesbysuperheros.
Finally, we need to setup views to render our Superheros. Blueprint folder src/main/resources/templates already contains several Thymleaf views that we can use as starting point. Because we renamed some of the data field in class Superhero, the Thymelaf views should show be update as well.
TODO 2-5: Rename and refactor view resources.
- Under folder
src/main/resourcesrename foldermyentitytosuperhero. - Use the IDE tool to Find&Replace across all
.htmlfiles in the renamed foldersuperhero, to do the following replacements:- word
entitybysuperheroand wordentitiesbysuperheros. - word img by avatar
- word check by vi
- word
TODO 2-6: Add support for new field name in superhero/ views.
Connecting to a MySQL DB
We will be using a MySQL DB to store and retrieve our application data – Superhero profiles, in the case. So we need to provide a MySQL database in some server, and to configure the app to connect to that server. While in development, we can use a local MySQL server. When deploying our app to the cloud, we want to use a cloud provided MySQL server, such as using EInnovator Cloud. Lets start with the local development approach first. d
TODO 3-1: Create a MySQL Datbase for Superheros
- Install MySQL server (if you have not done it so, yet), and select some root username and password.
- Create a new database named
superherosby typingmysql -uusername -pmyrootpassword -e "create database superheros".
We will be using Spring Data and JPA/Hibernate for persistence, with auto-schema creation. So the table SUPERHEROS will be created automatically for us at startup.
The next step is to configure the app to connect to ter DB server and database. In a Spring Boot app, this can be done conveniently in the application.yml by setting properties spring.datasource*`�.
*TODO 3-2: Configure app to connect to DB server
- Update the provide configuration file
application.ymlby setting values of properties spring.datasource.{url,username,password}url : jdbc:mysql://localhost/entities?verifyServerCertificate=false&useSSL=true&reconnect=trueusername : rootpassword : myrootpassword
The rest of the configuration for JPA is already in place. In particular, property jpa.hibernate.ddl:auto specifies auto-creation of schema that will have the definition of table Super heros.
At this point, you can start your Java application.
*TODO 3-3: Start the Superheros App
- In STS, use Run As > Spring Boot App. In Eclipse and other comparable IDE, use Run As > Java Standalone Application.
- Confirm that the app run successfully, and confirm that table
SUPERHEROwas created by typing:mysql -uusername -pmyrootpassword superheros -e "show tables". - Check out also the schema of the table by typing
mysql -uusername -pmyrootpassword superheros -e "show columns from superhero"
Provision a MySQL DB in the Cloud
Before you decide to deploy the app to the cloud, you will need to equally provision a cloud based MySQL database server. When using EInnovator Cloud, this is done by installing a MySQL marketplace solution as decribed and illustrated in the discussion below.
** TIP ** — If you prefer, you can skip this section and other related to cloud deploying, and continue reading the tutorial to learn about other programming and integration techniques used by the app. You can come back to this sections later, when you are ready to deploy the app to the cloud.
TODO 3-4: Deploy a MySQL Server on the Cloud
- Login into EInnovator Cloud Manager in https://cloud.einnovator.org (register first if you don’t have an account yet)
- Create a Project called MyApps with a single Space called Dev (for development). A Space is also associated with a cluster, and should have a namespace which needs to be unique across the cluster. So make sure the namespace for Space dev is unique - e.g.
myusername-myapps-devormyorg-myapps-dev, which are actually the default proposed names. Select cluster EU Central when creating the Space. (Projects can have spaces in same or different clusters, but for the purpose of this tutorial we are using only one Space and thus necessarily only one Cluster. (We are also using pre-available clusters. When creating dedicated clusters there is more freedom in selecting a namespace.) - Create one (or more) Domain as a sub-domain from existing ones. e.g.
myusername.nativex.cloudormyusername.einnovator.cloud.. You can also use you organization name rather than username as subdomain. In this case, you migth opt to created the project to be owned by your Organization group. (For deploying services in Sandbox free plan, the root domain should havesandbox.*prefix e.g.myusername.sandbox.nativex.cloudormyorg.sandbox.einnovator.cloud. For dedicated plans, you should created a domain whose root domain does not havesandbox.*prefix, such asmyorg.nativex.cloud, or provide your own DNS domain that should be verified. Another tutorial focusing on the Cloud Manager describes this in more detail.) - Install a MySQL Markteplace Solution, with appropriate storage capacity – e.g. 1Gi or a few Gi, should be more than enough for learning and early development. Make sure the selected Space is MyApps-Dev and the selected Domain is of the ones you just created.
- Confirm that the container running the MySQL database server is running. Use the status indicator, log, instance meta-data, and/or the database list in the Manage tab for this.
The steps above are illustrated in the images below. (A companion tutorial to this one explain in more detail how to use EInnovator Cloud Manager to deploy apps and services, and configured them. The explanation in this tutorial provides a basic introduction.)
** TIP ** Deploying MySQL databases, containers, and services in non Sandbox dedicated mode is a paid service in EInnovator Cloud, so you need to upgrade your account if you have not done yet so. However, when you do that you are charged only 1euro or 1USD for validation purposes, and get 20 free credits. This means that you can safely deploy a MySQL server, with a persistent volume of a few Gb of storage, and deploy the app as explained in the tutorial for a just a few cents if you keep it running for just a few hours or days. That is, if you stop the app container and the MySQL server after completing the tutorial no additional credits are charged for running containers. If you additionally delete the persistent volume, no other charge is made and you can keep the 20 credits for when you start developing your real business application. Additionally, the micro-services services that the blueprint and the superheros app integrates with (e.g. SSO Gateway), are used in Sandbox mode for the purpose of this tutorial. The Sandbox deployments are 100% free, although with limited user-count and request-rate, but enough to get started with development and work through the tutorials.
Creating a Database and a Connector
Let now create a database for the Superheros app and export it as Connector.
- Click on the Manage tab in the MySQL deployment, and the Database sub-tab.
- Create a Database named
superherosby clicking on button Add Database - Next, click on the Environment tab in the MySQL deployment, and the Connectors sub-tab.
- Create new connector, for database
superherosand userroot, which should get the automatic name ofsuperheros/root.
Building and Pushing a Docker Image
Once the cloud MySQL server is deployed and the database for the app is created, we have prepared the environment for the app to be deployed to the cloud as well. Naturally, before doing this, we need first to build the app locally, create a Docker image, and push that Image to some registry.
TODO 3-4: Building a Docker Image for the App
Below, we assume that you are pushing the image to a public Docker Hub repository. (The companion tutorial on EInnovator Cloud Manager explain how to use other registries and/or use private repositories.)
- From a terminal window, go to root folder of the project
superheros. - Run
mvn clean package -DskipTeststo build the app as WAR filetarget/superheros-1.0.RELEASE - Install docker (if you have not done so yet)
- Edit the provided Dockerfile, and change command COPY changing the name of the image to
target/superheros-1.0.RELEASE - Create a docker image for your app, by typing
docker build --file=Dockerfile --tag=mydockeruser/superheros:latest --rm=true - Push the image to the registry by typing
dock push mydockeruser/superheros. - Optinally, confirm in the DockerHub registry UI that the image was created and pushed.
(If you are using organization owned repositories you should change the image names accordingly, such as myorg/superheros.)
Three simple script are also provided with blueprint app to perform the steps above. You may prefer to modified then, and run:
- build.bat (Win) / build.sh (linux/Mac) – to build the app WAR with Maven
- dbuild.bat (Win) / dbuild.sh (linux/Mac) – to build the Docker image
- dpush.bat (Win) / dpush.sh (linux/Mac) – to push the app with maven
Deploying the App to EInnovator Cloud
With the Docker image in place, we are now fully ready to deploy the app to the cloud. We just need to make sure that the DB connection is configured appropriately also in the cloud environment. Fortunately, this is done automatically by EInnovator Cloud Manager if you specify a suitable Stack setting for the app.
TODO 3-4: Deploy the App in the Cloud with a MySQL binding
- From the Space Dev page, press button to Deploy to deploy your app.
- Enter the image name superheros from DockerHub public registry. (The display name, and unique name of the app are set automatically from the image name, although you can change if you want.)
- Select stack
Suite / Bootto tell the Cloud Manager, that the app is built using a Spring Boot stack, and additionally makes use of several services in EInnovator Micro-Service suite. - Leave the settings for the instance count and resources on the default values (1 instance, 1G memory, 1G storage).
- Keep the auto-create checkbox for Bindings. This ensures that the environment variable
spring.datasource.*is set with values picked-up from the MySQL connector namedsuperheros/root. Make sure that the unique name of the app (superheros) matches the name of the database. - Keep the auto-create checkbox for EnvVars checked. This ensures that the environment variable
server.portis to port mapped in the container (80 by default). - To have the app start automatically, keep the Auto-Start checkbox checked. Alternatively, you might prefer first the deployment and then started using the toolbar.
- Select a host for your app in the created domain, or keep the default. This makes the app available in URL
http://superheros.myusername.nativex.cloud. - Deploy the app.
- Wait till app and the container instance is in Running state. Should not take more than a few seconds.
- Check the logs, and confirm that no error occurred.
- On the Routes tab, confirm that a Route has been created. Click on View Application button, and confirm that the app home page opens.
** On Connectors and Bindings **
In general, there are two broad alternative approaches to configure an app environment in the cloud to connect with services such as DBs.
-
In one approach, the app is selectively modified to lookup cloud specific environment variables for connectors. This is the approach used when deploying apps to Cloud Foundry, where the VCAP_SERVICES environment variable is set with connector information (service URL and credentials) when a service is bound to the app. Frameworks like Spring Cloud Connectors, simplify implementation of this approach, by providing an API that hides the details of how the VCAP_SERVICES variable is picked up, parsed, and integrated in app. EInnovator Cloud Manager support this
legacyapproach to facilate porting of app, by setting the checkbox VCAP at deployment time. - An alternative approach, is for the devop or even better the cloud environment to set the same environment variables that the app is already expecting for configuration when running in localhost, such as
spring.datasource.*. This approach as the advantage of not requiring any modification of the app to run in the cloud, and is the preferred approach when using EInnovator Cloud Manager. The mechanism of connectors and bindings available in the Cloud Manager, makes it very easy to setup this. Specifically, the deployed MySQL server is configured to export a connector, for each specific pair of database and user/password credentials. Additionally, the app will have a binding that automatically sets thespring.datasource.*environment variables. This binding is automatically created when the app Stack is specified at deployment time, although it also possible to create the binding manually after deployment. This approach works because a binding specifies which environment variables should be set, and the value of the variables is evaluated in the context defined by a connector. For example, if binding defines a settingspring.datasource.url : ${jdbcUrl}, when expanded in the context of a connector the defines propertyjdbcUrl : "jdbc:mysql://hostip/superheros?...", will makes the environment variablespring.datasource.urlbe set tojdbc:mysql://hostip/superheros?....
Security Configuration: Authentication
When you open the application in a web browser, locally in http://localhost:6060 or in the cloud URL http://superheros.myusername.nativex.cloud defined in the Route, you may notice that only the home page of the app, with URL path /, can be accessed without login as some user. This is because the app integrates with EInnovator SSO Gateway via the imported the dependency einnovator-sso-started which does most of the security configuration automatically. In the default configuration, all URLs except the home page / and static resources are protected. We can fine tune the configuration by setting properties in the app application.yml file, as shown below:
sso
  server : https://sso.samples.sandbox.nativex.cloud
  client-id: application
  client-secret: application$12
  #ignoreInclude: "/guest/**, /public/**"
- Property
sso.serverspecifies the URL of the SSO server you want to use. The default settings that come from the blueprint should be changed to target to your SSO server (explained below). - Properties
client-idandclient-secretare an application identifier and secret for authentication purposes. Your app can use this credentials to make requests to the SSO Gateway and other services, authenticated as a trusted app. This is configured in the SSO Gateway server at deployment time or via the admin UI of the server (also explained below). - Property
ignoreIncludecan be set with a comma separated list of paths that are accessible without user login/registration.
(The complete set of properties that can be configured are define in Java class SsoClientConfiguration. Feel free to check it out with — e.g. use CTRL+SHIFT+T in STS/Eclipse.)
Deploying a SSO Gateway
The default setting for the SSO Gateway server out of the blueprint https://sso.samples.sandbox.nativex.cloud, uses a pre-deployed shared virtual server with name samples running in Sandbox plan/mode. You want to change this, so you can have your own set of users, configure and administer the server, or even customize the look&fell of the server UI as seen by your users. There is can be done in two broad variations: your own sandbox like the samples on, but with your owns database and a different name, or a dedicated server paid plan. With the Sandbox you are limited to a user pool of 100 users and limited request rate of 100 requests/hour, which is makes it mostly useful for early learning and exploration like following this tutorial. For real world development, you will want to upgrade to a dedicated server. The steps to follow to deploy a Sandbox or dedicated server are almost the same, but with the dedicated deployment you can obviously customize resources size like memory, number of instances, unlimited request rates, have enhanced security, and so forth.
TODO 4-1: Deploy a SSO Gateway
- Assuming you continue login in EInnovator Cloud Manager, and in Space
MyApps - devclick on the Manage tab in the MySQL deployment, and the Database sub-tab. Create a Database namedssoby clicking on button Add Database - Next, click on the Environment tab in the MySQL deployment, and the Connectors sub-tab. Create new connector, for database
ssoand userroot, which should get the automatic name ofsso/root. - Install a SSO Gateway Markteplace Solution, in Sandbox or dedicated plan. Keep the default host name
ssoand your previouslly created domain. Keep the auto-deploy checkbox checked. - Confirm that the container running the SSO is running. Use the status indicators, the logs and/or instance meta-data to confirm this.
- On the Routes tab, confirm that a Route has been created. Click on View Application button, and confirm that the app Admin registration form show up. This admin registration page shows up because there is no user registered yet, and the server assumes that the first user to register is the Administrator.
- On the admin registration form, enter your personal details and select a username and password.
- Confirm that registration is successful, and that the browser navigates to the admin console of the SSO Gateway.
- Feel free to explore the admin console, as well the regular user facing pages by pressing Back to Site. This allows you to edit your personal profile page, setup your organization, invite other users for you organization, etc. From the admin console, you can also fully manage you administer your user population, such as sending join invites, change user status, add them to groups as administrator, check site statistics in the admin dashboard, etc.
We are not going to discuss in much detail in this tutorial the SSO Gateway admin settings. You can check the reference documentation for this purpose.
Now that the SSO Gateway is running you want to reconfigure the app to use it.
TODO 4-2: Connecting to the SSO Gateway
- In the SSO Gateway deployment details page, click on the Environment &mdash ; Connectors and confirm that a connector named default has been automatically created with a setting url whose value is URL defined by the created Route.-
- Open now the Superheros deployment details page, and confirm that a binding was pre-created called sso. Although is not bound to any connector at this point, because we just deployed the SSO Gateway.
- Restart your Superheros app using the toolbar. Confirm that the app restarted with success and that the binding sso is now bound to the connector sso.
- Click on View Application button again in the Routes tab, and try to navigate to a protected page. Confirm that the login page shows up. Login in the Superheros app with your recentently created admin credentials, and confirm that login in successful. This proves that the Superheros app is now configured to use your SSO Gateway (Sandbox or dedicated, depending on the case).
Security Configuration: Custom Roles and Access Control
Some of the great features of the SSO Gateway in EInnovator micro-service suite include the ability for different kinds customization. In other tutorial, we discuss in detail how to customize the UI, create custom UI themes, custom signup and registrations pages, branding and customization of notification templates, among other aspects — Custom Themes. In this tutorial, we focus on how to perform role based access control with custom roles.
When an application starts it registers in the SSO Gateway. Exactly what is registered can be configured in the property sso.registration in application.yml. In particular, we can register custom roles used to role based access control in out Superheros app, while benefinting from the role assignment and security management available in the admin UI of the SSO Gateway. Roles can be of two types Global Roles and Group Roles. In the Superheros app, we will use only Global roles. In particular, we want to define a global role Superhero Manager which is required to delete Superheros created by other users.
TODO 5-1: Declare Global Role Superhero Manager
- Modify the provided role registration configuration under property
ssp.registration.rolesas found in the blueprint. Change the the name of the declared role toSuperhero Manager. - Make sure you keep property
auto: trueto have registration to be done automatically at deployment/start time. - Modify the property
sso.serverinapplication.ymlto use your cloud hosted SSO Gateway (sandbox or dedicated), such as:sso.server : https://sso.myusername.sandbox.nativex.cloud.
sso:
  ...
  registration:
    auto: true
    roles:
    - name: "MyApp Manager"
      global: true
TODO 5-2: Defining App Details
Since multiple app can register with the same SSO Gateway, we should also identify our Superheros app.
TODO 7-1: Configure the Application Registration Details.
- Set property
app.{id,name,info}inapplication.ymlsuitable for thesuperherosapp. - Restart the app locally. Confirm from the logs, that app registration was done with success.
app:
  id: superheros
  name: Superheros
  info: "Superheros DB Manager WebApp"
- Restart the app locally. Confirm from the logs, that app registration was done with success.
Although we have not implemented yet the role-based security policy, we can already experiment with the custom roles by assigning it to some users via the web UI of the SSO Gateway.
TODO 5-2: Assigning Roles and Invitations
- Open the admin UI of the SSO Gateway, press Roles button in toolbar, and confirm that the global role Superhero Manager was created.
- Open a different browser from the one you are using, or sitch to incognito window, and register a new user.
- As admin, assign the role Superhero Manager to the new user that was just registered.
- Next, add a third user setup directly from the admin console, and send invitation on creation. Use alternative emails for this purpose, or the same email with different
+sufix(e.g. myuser@domain.com, and myuser+1@domain.com, etc.). When creating the user and sending the invitation, make sure you have checkbox for the role Superhero manager checked. Check your (alternative) email, and confirm that the invitation email was received. Accept the invitation and complete signup. After signup and auto-login, check the user roles and confirm that this user has role Superhero Manager.
The purpose of roles is obviously to be able to perform role.based access control. This can be done declarativelly using Spring Security and SPEL expression or programaticaly using the API of the provided bean RoleManager defined by einnovator-sso-starter dependency. Furthermore, we can setup the security checks at service layer class SuperheroManagerImpl or in the Web or REST controllers.
TODO 5-3: Enforcing Role-Based Access Control
- In method
SuperheroManagerImpl.delete()apply a declarative security check to allow Superhero deletion only if user hasROLE_SUPERHERO_MANAGERorROLE_ADMIN, or if objected was created by principal.
@Service
public class SuperheroManagerImpl implements SuperheroManager {

	@PreAuthorize("hasAnyRole('ROLE_SUPERHERO', 'ROLE_ADMIN') or #superhero.createdBy==authentication.principal.username")
	public Superhero delete(Superhero superhero) {
		return super.delete(superhero);
	}
Alternatively, we can do the security checks programatically which migth turn to be more convenient if the security rule is somewhat complex.
- In method
SuperheroController.delete()implement programatic access-control by allowing Superhero deletion only if user asROLE_SUPERHERO_MANAGERorROLE_ADMIN, or if objected was created by the principal and no update was done recently in the object by other user.
@Controller
@RequestMapping("/superhero")
public class SuperheroController extends ControllerBase {

	@DeleteMapping("/{id:.*}")
	public String delete(@PathVariable id, ....) {
		...
		if (!( roleManager.isAdmin() || roleManager.hasRole('SUPERHERO_MANAGER') ||
			(superhero.createdBy(principal) && (super.getLastModifiedBy==null || superhero.lastModifiedBy(principal))) {
			flashForbidden("delete", redirectAttributes);
			return redirect("/superhero/" + id);
		}
		...
	}
- We can use a similiar approach in class
SuperherosRestController:
@RestController
@RequestMapping("/api/superhero")
public class SuperheroRestController  extends ControllerBase {

	@DeleteMapping("/{id:.*}")
	public ResponseEntity<Void> delete(@PathVariable id, ....) {
		...
		if (!( roleManager.isAdmin() || roleManager.hasRole('SUPERHERO_MANAGER') ||
			(superhero.createdBy(principal) && (super.getLastModifiedBy==null || superhero.lastModifiedBy(principal))) {
			return forbidden("delete");
		}
		...
	}
Let’s experiment with app and the SSO Gateway to confirm that the roles checks are working as expected.
TODO 5-3:Testing Access Control
- Restart the app after the role-based security checks are in place
- Login as one of non-admin users (if not done already)
- Create a new Superheros with one of the user or as admin
- Try do delete that Supehero while login as other user, and confirm that this is allowed since the user has role ROLE_SUPERHERO_MANAGER
- Create another Superheros
- Use the admin console to remove the role ROLE_SUPERHERO_MANAGER from one of the user
- Login as use different user from the one that created the last Superhero, and try to delete it. Confirm that the delete is not allowed since the user no longder ROLE_SUPERHERO_MANAGER.
Once you complete local testing, you can also rebuild and deploy the app to the cloud, with the role based access control in place. Say, as in a continous delivery practice.
TODO 5-4: Redeploying to the Cloud with Role-Based Access Control in place
- Rebuild the app, the docker images, and push it to the registry. You may want to use the scripts
build,dbuild, anddpushin order for that. - Once the Docker image is pushed, restart the Superheros app in your space MyApps - Dev.
- Confirm from the logs, that app registration was done with success.
- Open the admin UI of the SSO Gateway, press Roles button in toolbar, and confirm that the global role Superhero Manager was created.
- Repeast similar exploratory tests has done in localhost. Register and/or create/invites new users, and assign the role to some of them.
- Create Supehero with some users and try to delete them with other. Confirm that security policy is being enforced correctly.
File Storage: File Upload Configuration and Deploying a Document Store
Images can tell more than many words, and nowhere this is more true that for Superheros. Luckily, the blueprint app already has support for image upload. You can download some Superheros images from the net, and give it a try by create new or edit existing superheros that use this images.
Containers running on the cloud have by design emphemeral file-systems. So we need to prevent our uploaded files from being discarded when the container storage area is release. Alternative approaches can be used to address this. One it for the application to be configured with a persistent volume that is keept and reused even if the container is stopped and restarted. EInnovator Cloud Manager support his approach as explained below. However, this approach is not easy or convenient to scalable systems with multiple app instances because the persistent volume can not be shared across the instance. An alternative approach is to rely on external service that handle file persistence, and hides the details how scale, replication, and consistency are handled. EInnovator micro-service suite provides a Document Store marketplace service that can be used for this purpose. This as the added advantage that file admin and integration tools are provided to manage app files. Below, we start by explaining this second approach based on the Document Store but also come back to explain how to attach a volume to the app to cover the first approach.
TODO 6-1: Deploy the Document Store service.*
- Assuming you continue login in EInnovator Cloud Manager, install a Document Store Markteplace Solution, in Sandbox or dedicated plan. Keep the default host name
documentsand your previously created domain. For dedicated plan, select (at least) 1Gi of storage. Keep the auto-deploy checkbox checked. Deploy the service. - Confirm that the Document Store service is deployed with success. Use the status indicators, the logs and/or instance meta-data to confirm this.
- On the Routes tab, confirm that a Route has been created. Click on View Application button, and confirm that app file manager UI shows up.
The properties documents.server in application.yml of the app configure the details how document storage is done. Update the configuration to use your deployed service, rather than the default settings.
TODO 6-2: Configure File Storage.
- Set property
documents.servertohttps://documents.myusername.sandbox.nativex.cloudto store data in your server - Set property
documents.files.rootto/.meta/.superheros/for the virtual folder where the files of the Superhero app are stored - Restart the app locally
- Upload some super images login as some user
- In another browser tab, open the UI of the Document Store with URL
https://documents.myusername.sandbox.nativex.cloud - From the admin console of the Document Store, confirm that the uploaded files show up in virtual folder
/.meta/.superheros/for client app (user)application. - Explore the admin console of the Document Store, and check what kinds of Storage Providers are available for integration to scale up or increases the reliability of the storage solution.
documents:
  server: https://documents.myusername.sandbox.nativex.cloud
  files:
    root: /.meta/.superheros/
Once and whenever you make a configuration change to the Superheros app locally, you may opt to restart the application to use the newly deployed Document Store. Because a binding was pre-created to bind to a store in the same space, no need to rebuild the app and the Docker image this time.
TODO 6-3: Redeploying to the Cloud with remote Document Store
- Restart the Superheros app in space MyApps - Dev.
- Confirm from the logs, that app registration was done with success.
- Confirm also that the binding pre-created for the Document Store is now bound to a connector.
- Create or update Supeheros and upload new avatars. Confirm that it works.
- From the admin console of the Document Store, confirm that the uploaded files show up in virtual folder
/.meta/.superheros/for client app (user)application.
A simpler but less scalable approach for file persistence on the cloud is to attach a persistent Volume to the app container. Data in the file system of persistent Volumes are preserved even if the apps and containers attached to it are shutdown. Thus its possible to restart a different container using the same Volume. A key limitation though is that only container or one node can typically be connected to the same Volume.
TODO 6-4: Attach a Volume to the Superheros app.
- Open the volume tab for the Superheros deployment.
- Add a new volume with size 1Gi. Mounted the volume in path
/datawhich is the default assumed by the Document Store. (Because the configuration specifies the folder/.meta/.superheros/for location of uploaded filed, the physical path in the volume will be/data/users/application/.meta/.superheros/). - Click on the Environment—Vars, and add new enviroment variable
documents.local = true. This will make thedocuments.serverproperty set by the bindings be ignored, and use local persistence provided by the volume in stead. - Restart the app. Check the logs first messages, and confirm that local storage was enabled.~
- Create or update Supeheros and upload new avatars. Confirm that it works.
(Persistence Volumes are a paid Service in EInnovator Cloud, whose price depends on the storage amount. Allocating a 1Gi Volume for a few days, say while you go through this tutorial, should not cost more than a few cents.)
Some additional properties that might be useful or required to set related to maximum file upload size.
TODO 6-5: Increase maximum upload file size.
spring:
  servlet: #boot2
    multipart:
      max-file-size: 1000MB
      max-request-size: 1000MB
  http:
    multipart:
      max-file-size: 1000MB
      max-request-size: 1000MB
Publishing Notifications
To improve user engagement we want the Superheros app to send notifications to users when certain events occur. In particular, we want notifications when a Superhero is updated to the user that first created the Superhero or last modified it, and to users with role SUPERHERO_MANAGER when a new Superhero is created or updated. Additionally, we want uses to receive notification via multiple channels, including email, SMS, and in app, and be able to customize their notification preferences. For this purpose, we will deploy the Notifications Hub of the EInnovator microservices suite and refactor the app to register new three new kinds of notifications on startup. A bonus point of using the Notifications Hub is that as app admins we can send newsletters and other email communications to our users (e.g. about Superheros* inside stories and news about app updates), or even perform SMS based campaigns.
TODO 7-2: Deploy the Notification Hub marketplace service.
- Use the Cloud Manager to install the Notification Hub as a Marketplace Solution, in Sandbox or dedicated plan. Keep the default host name
notificationsand use (one of) your previously created domain. Keep the auto-deploy checkbox checked. Deploy the service. - Confirm that the Notification Hub service is deployed with success. Use the status indicators, the logs and/or instance meta-data to confirm this.
- On the Routes tab, confirm that a Route has been created. Click on View Application button, and confirm that app file manager UI shows up. Press the notification Preferences button.
- Back to the Cloud Manager restart the SSO Gateway and the Document Store in space MyApps - Dev. Wait for the services to restart. Check the logs first lines, and confirm that both services manage to register in the Notifications Hub.
- Back to the Notifications Hub browser tab, reload the Preferences page, and confirm that notification preferences for SSO and Document show.
Next we want to create Superhero related notifications and register them.
TODO 7-3: Configure Notifications and Register Custom Notifications.
- Set property
notificaitons.serverof the Superheros app to the URL of the deployed servicehttp://notifications.myusername.sandbox.nativex.cloud(or other).
notifications:
  server: https://notifications.myusername.sandbox.nativex.cloud
TODO 7-4: Register Custom Notifications.
- In property
notifications.registration.typesconfigure 3 new notification types all withsource-type: Superheroand 3 differentaction-typeascreate,update,delete. In propertylabelordescriptionenter the text you will want the user to see when updating preferences. Optionally, set descriptive propertycategory: Basic. - Make sure property
notifications.registration.auto:truefor automatic registration. - Restart the app in localhost. Check the app logs first lines, and confirm that the registration of the
Notifications Typeswas successful. - Additionally, confirm this by checking the log tail of the `Notification Hub from the Cloud Manager UI.
- Reload the Preferences UI page, and confirm that the a new tab shows up for the Supeheros app with the three new notification types.
  registration:
    auto: true
    types:
    - source-type: Superhero
      action-type: Create
      description: "Do you want to receive notification when a Entity is created ?"
      category: Basic
The app should also be setup to send notifications via the Notification Hub. The base class ManagerBaseImpl(3) of SuperherosManagaerImpl we are using, already has some good support to help us do this.
TODO 7-5: Publishing events / Sending Notifications.
- Check the source code or documentation of
org.einnovator.jpa.manager.ManagerBase2, and notice that provided methodscreate(),update(),delete()have a (last) parameterboolean publish. This specifies if events should be be send, and as a consequently have notification send to users. - Review the code of
SuperheroControllerin the lines whereSuperheroManageris invoked, and make sure that parameterpublishistrue(if not done yet). - To define which users should receive each type of notification we can override method
getTargets*()inSuperheroManager. - Defined method
getTargetsCreate()to return.superhero-manager, which selects all users the have global roleSUPERHERO_MANAGER. - Similarly, define method
getTargetsDelete()to return.superhero-manager. - Defined method
getTargetsUpdate()to returnArrays.asList(superhero.getCreatedBy(), superhero.getLastModifiedBy()), which selects the user that first created the Superhero and the one that last modified it (if any).
protected List<String> getTargetsCreate(Superhero superhero) {
	return Arrays.asList(`.superhero-manager`);
}

protected List<String> getTargetsDelete(Superhero superhero) {
	return getTargetsCreate(superhero);
}

protected List<String> getTargetsUpdate(Superhero superhero) {
	return Arrays.asList(superhero.getCreatedBy(), superhero.getLastModifiedBy());
}
TODO 7-5: Experimenting with Notifications.
- Restart the Superheros app locally
- Create a new Superhero login as any user that does not have the role
SUPERHERO_MANAGER - Check the mailbox of one of the users that has role
SUPERHERO_MANAGERand confirm that a notification message is received with subjectSuperhero Created(you may need to wait a few seconds for the pre-configured SMTP server to send the message) - Update the Superhero login as any user
- Check the mailbox of the user that first created the super and confirm that a notification email was received
The received notification messages has a canned look&fell. In a real world app, you will likely want to notifications with custom branding and custom content. You can check a companion tutorial to learn about the different way this can be done. Custom Themes.
With current configuration, notifications are send to the Notificaitons Hub using HTTP and a REST API. In many uses cases, specially in more complex architectures where the business functionality is implemented with multiple micro-services, it is desirable to use asynchronous message-based communication to deliver and handle notifications. Another companion tutoriral explain how this can be done, using RabbitMQ as a marteplace solution. Custom Themes.
At this point you might want to rebuild the app, and redeploy that image to the cloud using the same steps as explained above.
Social Media: Posting Comments
Superheros are usually popular and have lots of fans (and some detractors). We would like fans and detractors to be able to post comments and have discussions related to Superheros. Rather than reinventing the wheel and develop a commenting and social discussion functionality from the ground-up for specifically for the Superheros, will the more convenient approach of integrating the app with the Social Hub service from EInnovator micro-service suite. Specifically, we want to have a general Superhero discussion forum, and will want each Superhero details page to have its own dedicate discussion channel. Social Hub also support additional features like social impressions (e.g. likes and star ratings) case we decide to integrate that later.
TODO 8-1: Deploy the Social Hub marketplace service.
- Use the Cloud Manager to install the Social Hub as a Marketplace Solution, in Sandbox or dedicated plan. Keep the default host name
socialand use (one of) your previously created domains. Keep the auto-deploy checkbox checked. Deploy the service. - Confirm that the Social Hub service is deployed with success. Use the status indicators, the logs and/or instance meta-data to confirm this.
- On the Routes tab, confirm that a Route has been created. Click on View Application button, and confirm that UI shows up.
TODO 8-2: Configure the Superhero app to use Social Hub.
The properties documents.server in application.yml of the app configure the details how document storage is done. Update the configuration to use your deployed service, rather than the default settings.
- In
application.yml, set propertysocial.servertohttps://social.myusername.sandbox.nativex.cloudto connect to the deploy Social Service hub. - Register an initial
Channelof typeFORUMnameSuperheros Community. - Restart the app.
- Reload the UI of the Social Hub and confirm that the discussion forum shows up
- Login as one or more users, and post some tests messages to the Forum via the SocialHub UI
- Add a link-button on the Superhero list page to navigate to the community Forum:
<a class="btn btn-primary btn-lg" href="https://social.myusername.sandbox.nativex.cloud">FORUM</a>
social:
  server: https://social.myusername.sandbox.nativex.cloud
  registration:
    auto: true
    channels:
    - name: "Superheros"
      type: "FORUM"
      purpose: "Superheros Community discussion forum"
We also want to create dynamic Channels to have Superhero specific comment threads.
TODO 8-3: Create Channels for Superheros.
- In class
SuperheroManagerImpl, review methodprocessAfterPersistence()and confirm that a socialChannelis being created (or updated) whenever a Superhero is created (or updated) - In the view page
superhero/show.html, notice the import of pagelayout\comments.html. Open this page, and confirm that Javascript line$.social({channel: channelId});is being called to render the comments thread in the bottom of each Superhero details page. - Check any Superhero detail page and confirm that a comment thread and post message box showup in the bottom of the page. Post some comments logged in as different users.
Channel channel = superhero.makeChannel(getBaseUri());
channel = channelManager.createOrUpdateChannel(channel);
if (channel!=null && superhero.getChannelId()==null) {
	superhero.setChannelId(channel.getUuid());
	repository.save(entity);
}
Summary
In this getting started tutorial, we learn how to build microservice-enabled application for management of Supeheros using EInnovator micro-services. We build a docker image for the app and deployed to the cloud using the Cloud Manager. We installed different marketplace solutions. The SSO Gateway for authentication and role-based access control. The Document Store for file upload persistence. The Notification Hub for sending notification to users about Superheros updates. And Social Hub to setup a discussion forum and post comments about the Superheros.
Exercises
You may want to get some more experience in developing micro-service applications by selecting some of the exercises below to extend the Superheros app:
- Add a new field
Superhero.locked, and update the access control rules so that Superheros with propertylocked=truecan only be updated by users with roleSUPERHERO_MANAGER - Update the notification publishing rules so that a message is automatically posted to the general discussion forum when a new superhero is created. Do this by returning the target selector
"#superheros"in methodSuperheroManagerImpl.getTargetsCreate().
Learning More
- Cloud Manager Reference Manual
- Cloud Manager First Tutorial
- Java Docs for einnovator-sso-starter
- Java Docs for einnovator-notifications-starter
- Java Docs for einnovator-documents-starter
- Java Docs for einnovator-social-starter

Comments and Discussion